Mender blog

We are excited to announce the Mender 2.7 release, together with maintenance releases Mender 2.6.1 and 2.4.3!
Mender 2.7 introduces optional add-on packages, containing a set of features, for solving device management use cases. These add-on packages can be enabled on your commercial Mender subscription (both hosted and on-premise) for an additional subscription fee. Some of the add-on features are also available as open source.
The add-on packages will give users and customers an expansion path to customize and enhance their plans to meet other device fleet management requirements.
We have updated our terms of services to reflect the new add-on offerings, and also to improve certain terms for clarity like expressively saying that we will not decompress, analyze nor scrape any of the new data files.
Troubleshoot
The first add-on package “Troubleshoot”, contains features to quickly and securely resolve live issues with a device. A typical case is that a customer contacts you through support because a device is not working to his or her expectations. Time is of the essence. Now what?
Remote terminal
The starting point in troubleshooting a device is usually to log in to the device terminal. From there you can check if applications/processes are running properly and restart them if needed. You can also change configuration settings directly or test connectivity.

Security is always top of mind when enabling a remote terminal, so all communication is encrypted with TLS and there are no open ports on the device. You can also use a restricted user at the device to limit what can be done. Read more about how the Remote terminal ensures security from all angles in its documentation section about Security.
With Mender Enterprise you get integration to the Audit log, so you can see who connected to the device and when. Role based access control (RBAC) is also supported for the Remote terminal, so you can limit which users of the Mender server can log in to given groups of devices.
With the mender-cli, you can also access your device terminal from your local workstation terminal as well, by first obtaining the Device ID of the desired device as shown in the UI under Devices, or using the new command mender-cli devices list.
Remote terminal session log
When using the Remote terminal in the Mender Enterprise plan, the complete terminal session is logged to the Audit log, to ensure compliance and help identify root causes of any issues discovered.
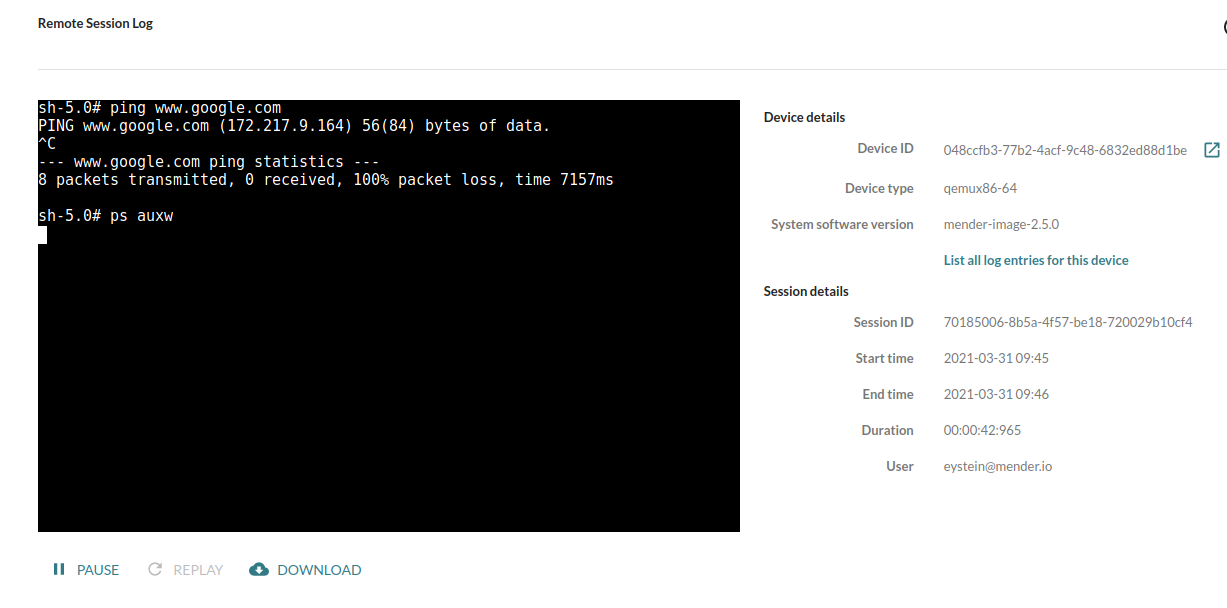
You can replay the complete terminal session, including all executed commands, outputs and even see what is done inside applications such as text editors. For security reasons, hidden input (such as interactively typing passwords) are not stored in the session log - technically only the output from the terminal session is stored.
File transfer
File transfer is a useful complement to the Remote terminal when troubleshooting a device.
Copying potentially large log files or crash dumps from the device is useful to do a deeper analysis, locally on your workstation, of what is going on.
![]()
Then you might be suspicious of the performance of a particular application, so you need some more profiling or debugging tools available to investigate further. You already have a script that tests for common problems, but how do you get it to the device so you can execute it? Other diagnostics tools like gdb, valgrind and tcpdump may not be available on a production device either, and it may not be a good idea to install it on the system level -- rather you want a way to transfer them so you can remove them afterwards quickly and with minimal disruption.
You could discover there is a problem with the application or a set of configurations running on the device that needs to be updated immediately to fix the problem. You can use File transfer to copy a default application or configuration version, or a slightly modified version that resolves this particular issue until a new official version is released.
File transfers can be carried out directly from the Mender UI through the “File transfer” interface. However, there are also quicker ways to copy files directly from the Remote terminal interface:
- To upload a file to the device, simply drag and drop the file to the Remote terminal window. It will then be uploaded to /tmp/ by default, and you can change the destination before uploading.
- To copy a file from the device, you can print the file path in your Remote terminal (e.g. using realpath ), hold your modifier key (usually CTRL or CMD) and click on the filepath - the file download will start. If the file could not be immediately downloaded the clicked on content will be prefilled in the File transfer tab of the troubleshoot dialog.
File transfer can also be carried out locally from the command line using mender-cli.
Port forward
If network connectivity or response from services looks suboptimal, it is useful to be able to forward a port to, or via, the device to further investigate.
The common case is to forward a port on your local workstation to the device locally. For example, if the device is running a service that accepts connections from nearby devices to gather data, you can connect to this service, send data, and see if it works properly.
Using the same method, you can also connect to any local web admin panel the device may have and bring it up on your workstation’s web browser, to see status or change configuration.
Port forwarding is not limited to the local device, so you can also forward a port that is remote to the device. This means you can ask the device to connect to a port on another device in the local network, or even your cloud backend, to test connectivity and responses as seen by the device.
Port forwarding can be set up locally on your workstation with mender-cli. After installing mender-cli, remember to run mender-cli login to authenticate with the Mender server. Then forwarding port 8000 on a given device, is as easy as:
mender-cli port-forward 048ccfb3-77b2-4acf-9c48-6832ed88d1be 8000:8000
Configure
The Configure add-on package allows you to customize each device to its environment by setting key-value configuration attributes that can be unique to each device.
Configuration UI
Even when trying to keep the device fleet as identical as possible to keep things simple, some configuration may need to vary across the fleet or even be unique for every single device. Typical examples of this can be network settings, timezone, license/entitlements for customers, configuration of which backend services to use for device applications and credentials or keys to use for authenticating.
The Mender Configure UI allows you to define a set of key-value attributes to configure a device to your needs, e.g. “timezone” = “Europe/Berlin” and “customer_licenses” = “12”. You can add an arbitrary amount of configuration settings as needed.
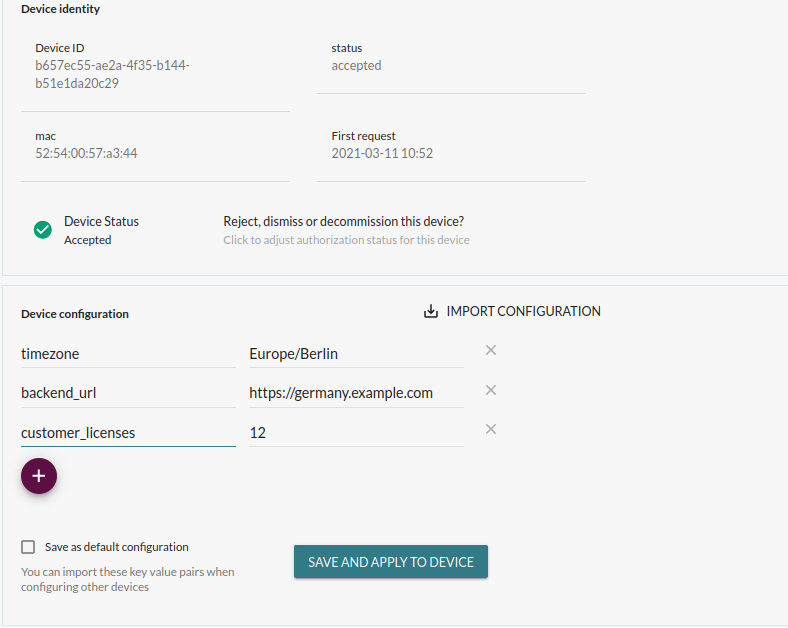
To make the process less error-prone and faster, you can save a given device configuration as the default configuration. This is a set of key-value attributes that you can use when configuring other devices later, perhaps adjusting them slightly to the new devices before applying.
It is possible to define configuration before a device is accepted into the server. This way you can preconfigure the device before it comes online, and the configuration would be applied once it does.
In case you have a different system that serves as the definition point for device configuration, such as a GitHub repository, you can import a JSON file with configuration for the device. As always, there is also a REST API available you can use to define the configuration for a given device.
In the Mender Enterprise plan, defining configuration is protected by Role Based Access Control (RBAC), which means that you can choose which users are allowed to configure which devices, just like you can for deploying OTA software updates.
Mender Enterprise also supports an Audit log, where you can see which configuration has been applied to which devices and by whom.
Configuration report
Once you have defined the configuration and deployed it to devices, everything may go well or it may fail for many reasons.
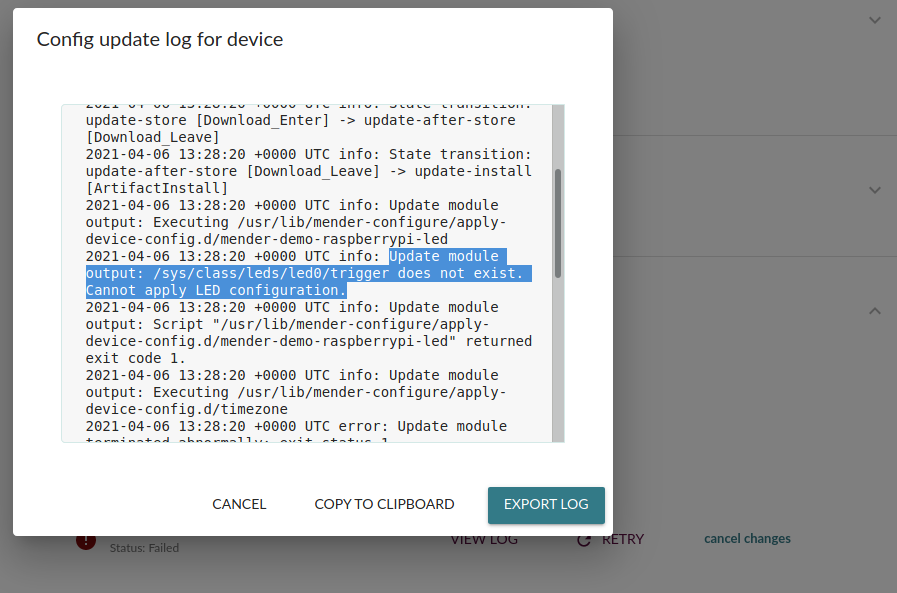
Mender Configure tracks the status of the last configuration deployment. At the most basic level, it either failed or succeeded. In case there is a failure, there is a log available to help understand the cause of the failure so it can be either adjusted or retried.
Most importantly, Mender Configure tracks the last successfully applied configuration, as reported by the device. Note that this may be different from the configuration that was most recently deployed because the last deployed configuration may not have been obtained by the device yet, or it might have failed. This report can serve as the source of truth about the actual configuration of the device.
Script interface
Some configuration settings can be applied in a standard and generic way. For example, in most Linux distributions, the timezone can be set using the tzconfig command-line utility. Unfortunately, this is more the exception than the rule, as different OS distributions often have different ways to be configured.
In addition to differences between operating systems and application installations, there are configuration settings that are custom to your applications, such as how to configure license entitlements for your customers.
For these reasons, Mender Configure has a script interface on the device, so you can define exactly how any given configuration is applied to the device. Technically, Mender will store the configuration on the device as a JSON file (/var/lib/mender-configure/device-config.json) and then run all executables in a well-known directory (/usr/lib/mender-configure/apply-device-config.d/) whenever there is a new configuration available. Read more on how to apply device configuration in the documentation.
For more advanced configuration, you can even tie in dedicated configuration management products like CFEngine or Ansible to apply the given configuration at the device.
Rollback is supported, so if the script or product applying the configuration reports failure (returns nonzero exit code), the original JSON configuration is restored and the executables in the directory are re-run with the old configuration settings in place to restore them.
Try the new features
Here are some pages with more information to get you started with the new features of Mender 2.7:
- Get started - The best place to do a quick test of the new release from scratch.
- Remote terminal - Overview and installation instructions for the new Remote terminal, including how to add it to existing devices under management.
- Configure - Overview of how device configuration works and how to get started.
- mender-cli download - Install the latest version of mender-cli to benefit from the new port forwarding and file transfer add-ons.
Support for your board
If you are getting started with OTA updates, or do not have time to integrate the Mender client with your board for robust A/B system updates, there are several resources available to you!
The Board Integrations category in Mender Hub is a community site to contribute, reuse and maintain Mender board integrations.
We are also happy to help with consulting services to enable verified Mender support for your board!
Share your feedback
We appreciate your general feedback on Mender, be it positive or need for improvement, in the Mender Hub General Discussions forum. Your continued feedback ensures Mender will meet your needs even better in the future!
If you believe you have encountered a bug, please submit your report at the Mender JIRA issue tracker.
We hope you enjoy the new features and are looking forward to hearing from you!
Recent articles

New Release – Hosted Mender 4.2.0: Stronger account security and a refreshed management experience
Discover the latest updates in Hosted Mender 4.2.0, featuring enhanced security, unified login options, and improved device management for IoT solutions.
New in Mender: Introducing support for Yocto 6.0 Wrynose LTS
Mender introduces support for Yocto 6.0 Wrynose LTS, updating components and enhancing compatibility. Discover the latest features and improvements for seamless IoT updates.

An expert Q&A session on the EU Cyber Resilience Act: Industry insights from STMicroelectronics and Northern.tech
Explore expert insights on the EU Cyber Resilience Act, its implications for IoT products, and essential compliance strategies from industry leaders.
Learn why leading companies choose Mender
Discover how Mender empowers both you and your customers with secure and reliable over-the-air updates for IoT devices. Focus on your product, and benefit from specialized OTA expertise and best practices.