Written by Wolfhard Prell, developer at Inovex. Published in association with Mender and Inovex.


This article will describe the migration from Android Things to a more specialized embedded solution using Yocto, Mender and Flutter for a meeting room management project. The project was completed by developers from Inovex. Inovex is an IT project house with a focus on digital transformation. At Inovex, over 250 consultants and IT engineers support companies in adding digital capabilities to their core competencies and implementing new value-added models. Inovex's portfolio includes web and mobile development, business intelligence, big data and search, data center automation and cloud infrastructures. Inovex has offices in Karlsruhe, Pforzheim, Munich, Cologne, Hamburg and Stuttgart and is involved in projects across Germany.
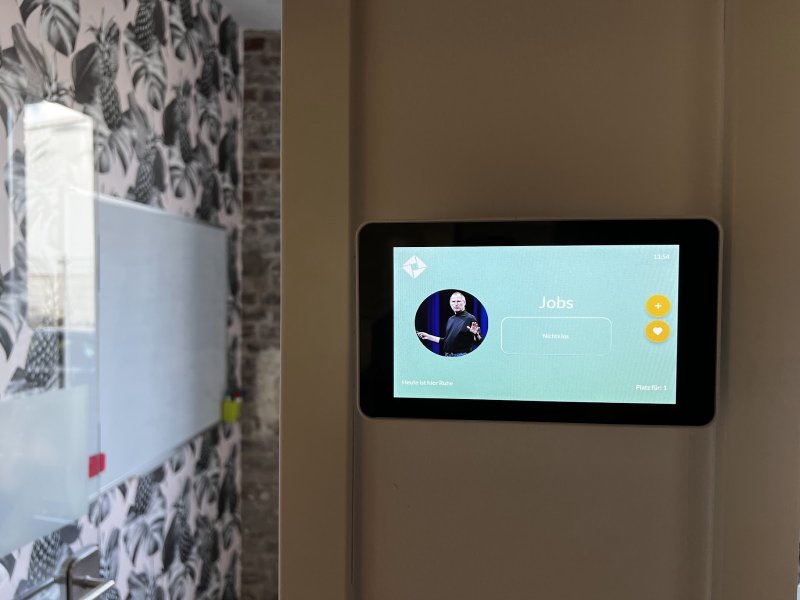
Use case: Managing meeting room status
When approaching a meeting room, one would ideally like to see the occupation status of the room without consulting your phone’s calendar or disturbing an attendee of the meeting. Key information that the display should provide are:
- What is the name of the room?
- Is it currently booked?
- When will the next meeting begin?
At Inovex, Google Workspace is used as a calendar synchronization solution, being the single source of truth for meetings and events. From a server perspective, this fulfills all the requirements for the project. Additionally, with the default Google Calendar set, Google Workspace offers the ability to specify meeting rooms as resources that can be reserved when creating calendar events. Additional room details such as capacity or available equipment can be set by the workspace administrator. The meeting room display checks periodically for new or edited events through the Google Calendar API and updates its views to match the state of the event. Each display is assigned to a single room. Being able to book a meeting room immediately using the display is a very useful feature. Just as long as the room isn’t occupied!
Raspberry Pi hardware
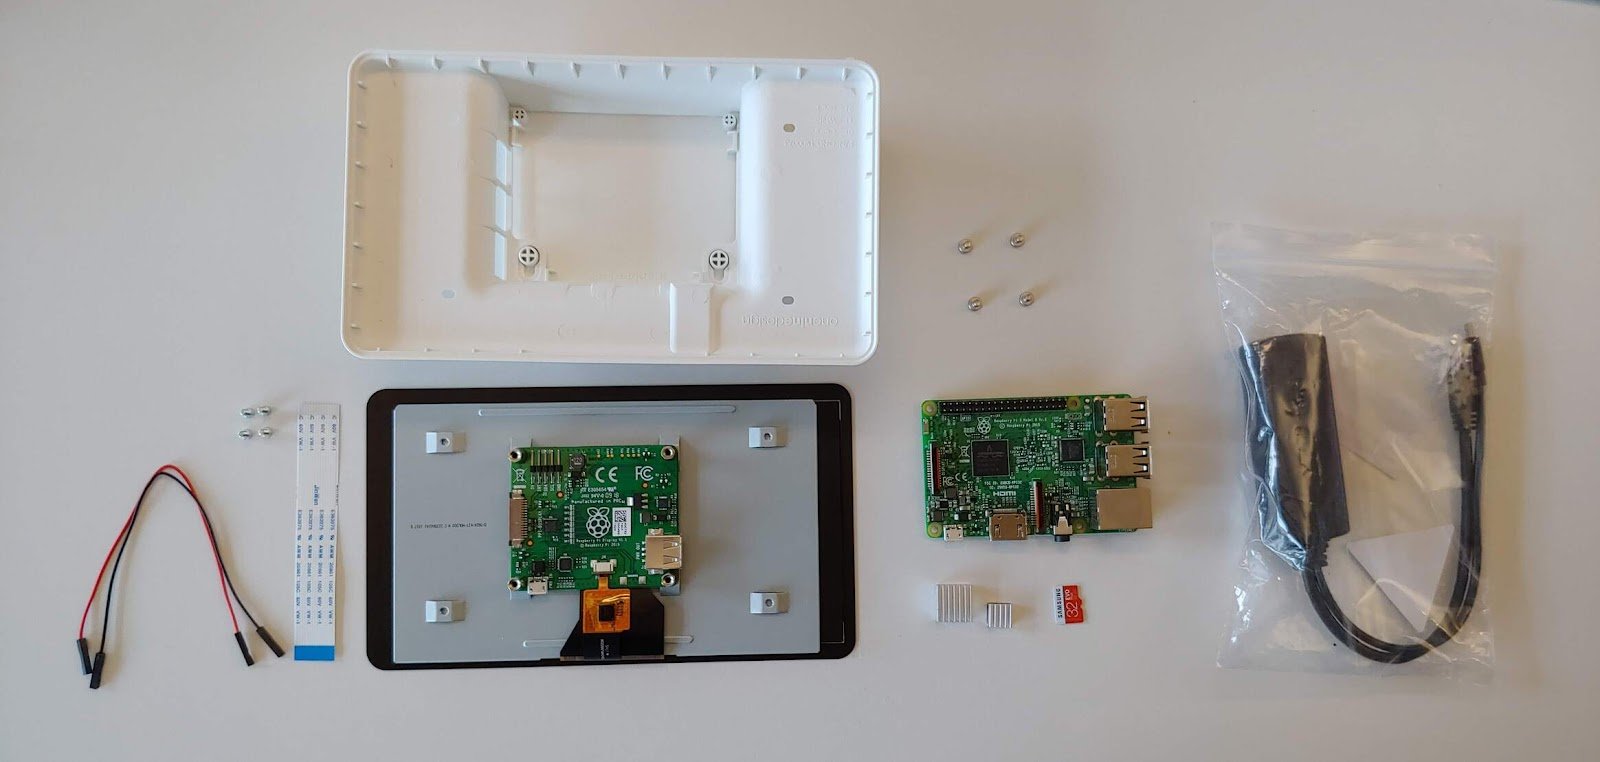
On the hardware side, our current setup is made of:
- Raspberry Pi 3 Model B
- Touchscreen display
- Display case including cabling
- Heat sinks
- PoE splitter
The case is needed to mount the display to the wall. Using Power over Ethernet (PoE) removes the need for an additional power supply unit. Because the Raspberry Pi doesn’t have onboard PoE support, the splitter allows to supply power via the Micro-USB port. Due to its widespread use, the Raspberry Pi benefits from good general software support and was supported by Android Things. But it has some flaws, like under-voltage issues when using a PSU that doesn’t provide sufficiently stable 5V — so we will move to compute modules in the next hardware revision.
Android Things
Android Things was deprecated on January 5th, 2022 and so it needed to be replaced in the project. Originally code-named Brillo, Google announced Android for embedded devices at the Google IO 2015. Later, the name was changed to Android Things. Version 1.0 was released in 2018 and several smart devices based on it have been released by the likes of Lenovo, LG, and JBL. These devices have included smart home displays and speakers.
Android Things offered building apps using the Android stack. Starting and debugging an app on a Raspberry Pi could be easily done with the Android Debug Bridge (ADB), without any noticeable differences to the development on an Android phone. The Raspberry Pi 3B and NXP i.MX7D were, for example, announced as supported devices for development.
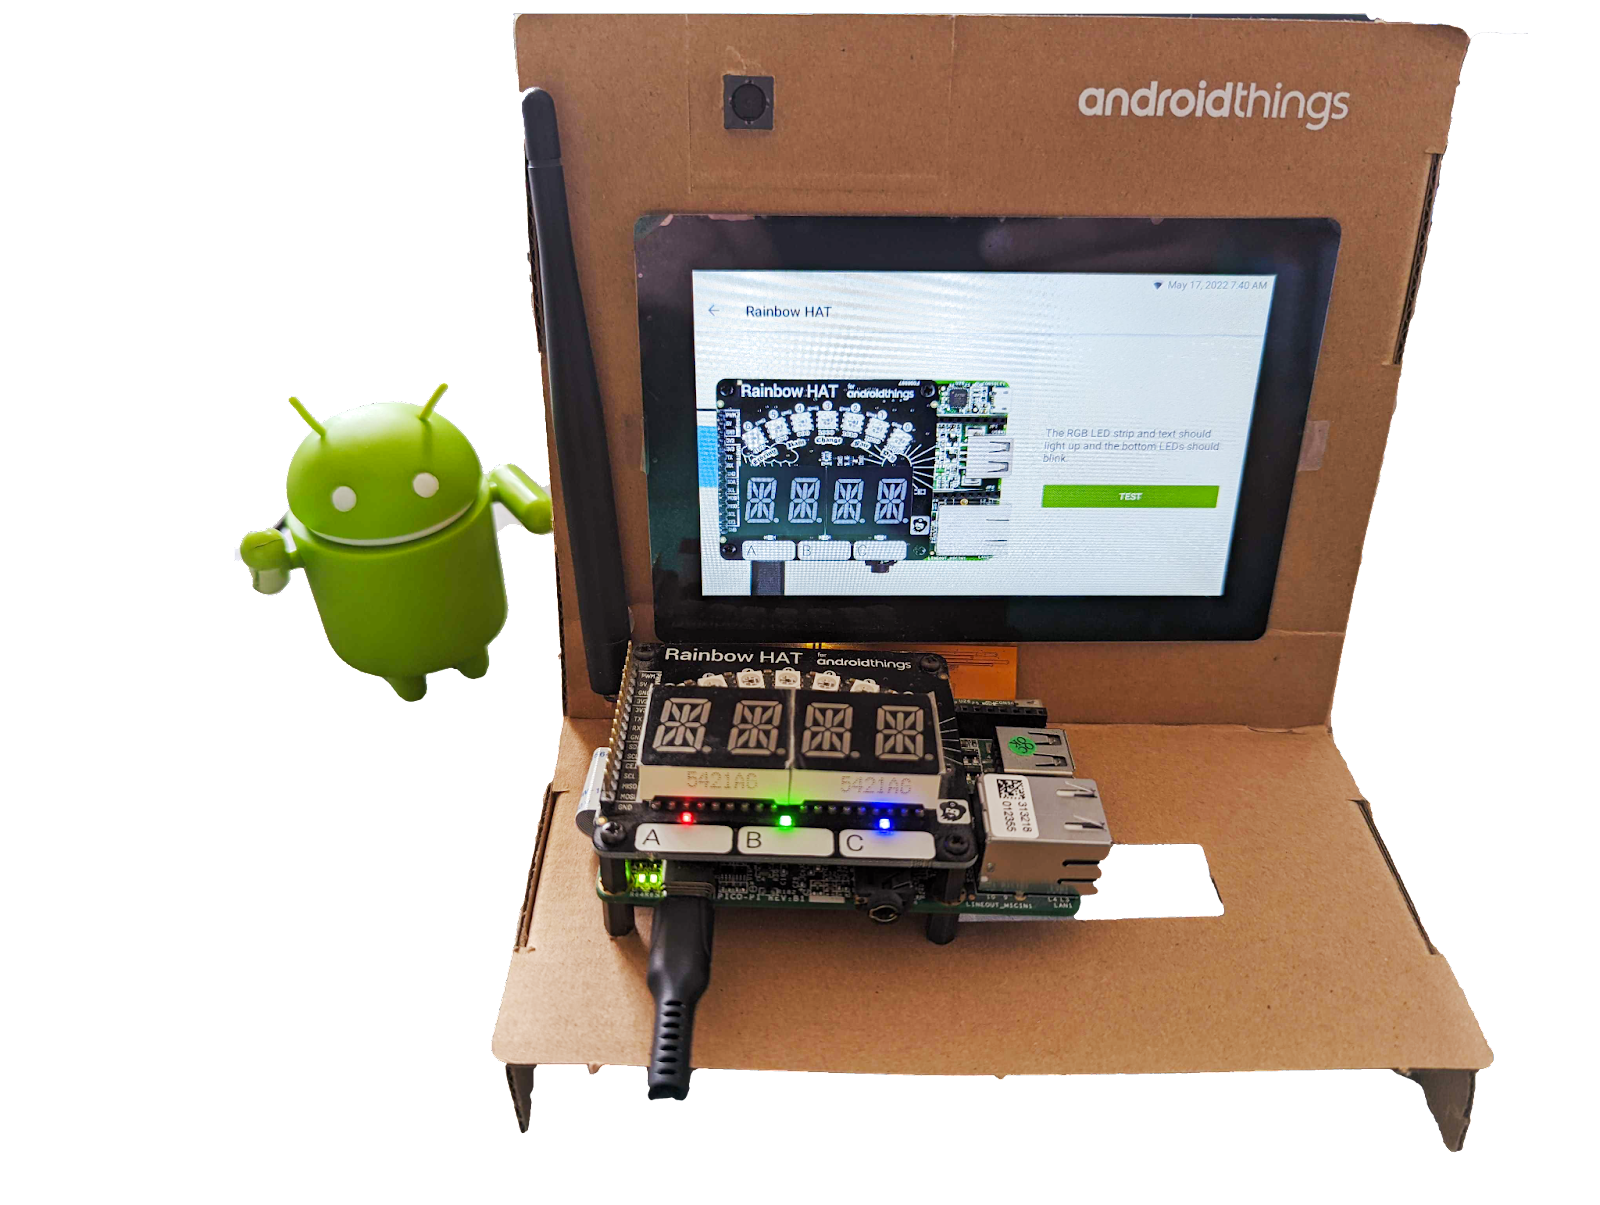 Figure 1: Android Things starter kit
In contrast to the usual Android world, additional Things-specific Android APIs were offered. An interesting feature was the support for user-space drivers. User-space drivers allowed developers to access peripherals such as sensors without the need to touch the privileged kernel world. By building on top of well-defined Android APIs, the drivers could be easily shared and used as a library dependency. On the other hand, it was not possible to add features that run out of scope of the provided APIs for user drivers, which would again require additional Linux kernel drivers.
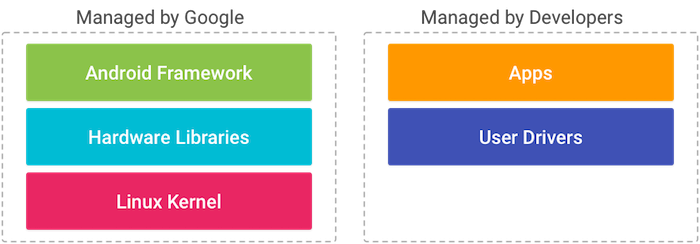 Figure 2: Android Things architecture overview
Android Things Developer Console
The Android Things Developer Console allowed project/device management and Over-the-Air software updates (OTA). When creating a new release, a user-provided app in the form of a .apk file could be uploaded with the web interface. The app was bundled with an Android OS image. The resulting ISO could be downloaded and written to an SD card. Alternatively, it could be used with the OTA update mechanism as well. As known from usual Android devices, A/B updates provided a fault-tolerant update mechanism and was also added to Android Things. The OTA deployment procedure could take up to five hours and crucially it missed detailed progress monitoring. Furthermore, it wasn’t possible to define an update deployment schedule. It would have been very nice to be able to set it just to update devices at night but this wasn’t possible.
Farewell to Android Things: Hello Raspberry Pi, Flutter, Yocto
With news of the deprecation, a more modern solution had to be found to support a new platform for the meeting room displays and preferably, one that would resolve issues such as the vendor lock-in we had experienced earlier. So a solution combining Raspberry Pi, Yocto, Flutter and Mender was selected as the best option.
Embedded Linux: The Yocto Project
An Inovex Smart Building project had already made use of the Yocto Project. In contrast to Android Things, Yocto offers more flexibility regarding platform and driver support, by taking control of the Linux image creation process. A drawback with this flexibility is the requirement to tackle the complexity of embedded system development and Yocto itself. An example of this is the requirement to create different OS images for development and production. SSH access during development is useful, but is a security issue for production.
A core feature of any build system for usage with embedded devices is reproducibility. Our preference is to build deterministic environments, but interactively modifying a running Linux instance and cloning the finished image from the SD card will sacrifice this because changes aren’t transparent and version controlled. Yocto uses layers of metadata to represent a platform and its capabilities. Composing these layers creates a new template, serving as a declaration for our custom embedded Linux. Layers are used as foundation and often provided by OEMs. On top of these layers, new ones are built, describing the application use case. The layers contain build recipes, and bitbake executes the necessary steps according to the steps defined by the recipe instructions, when started. After steps like fetching, patching, compiling and linking, the bootable Linux image is produced.
Instead of using a pre-built Android Things image, building it yourself enables the use of different devices in parallel. For example, the discontinuation of the Raspberry Pi 3 wouldn’t require replacing all our other devices. Successive integration of newer platforms like the Raspberry Pi 4 or the Raspberry Pi Compute Module is possible. Mender makes it possible to manage a plethora of different devices with different specifications and architectures, preventing the distribution of an incompatible update. Furthermore, an embedded build system can be used in a CI/CD pipeline context, in order to automate the build process. With Yocto as the main building block for the Linux system, there is still a need to replace several Android Things Console capabilities, such as:
- Over-the-air updates
- A/B partitioning to apply system updates in a fail-safe manner
- Deterministic system updates
Mender for OTA updates with Raspberry Pi, Yocto and Flutter
Mender provides “secure, risk-tolerant and efficient over-the-air updates for all device software”, which removes the need to create a DIY solution. The OTA implementation checklist demonstrates just how difficult and non-trivial it is to build and manage an OTA updates solution.
Besides OTA updates and device fleet management options, Mender has additional benefits for our prospect including:
In contrast to the Android Things developer console, self-hosting is possible, too. For the meeting room project, we decided to use the hosted solution provided by Mender, but depending on the progress and scope of this and other projects it might be beneficial to change to an on-premise setup.
On the client-side, the Mender client is required for communicating with the management server and supervising the device update cycle. The meta-mender layer can be used for easy Yocto integration. Other platforms and build tools are supported as well. When a device running software including the Mender integration boots for the first time, it will be registered at the management server. Without preauthorization, devices are manually accepted using the web UI. A default set of attributes is populated by Mender per device, like the city name, which is based on the geolocation IP. This conveniently enables sorting the devices into groups based on the device location. There are two types of groups: static and dynamic. Devices can be manually added to static groups, which needs to be done for every new device. On the other hand, a dynamic group can be defined by attribute filters. A device will be automatically added to a group specified by the filter. Dynamic groups are part of the Mender Enterprise plan.
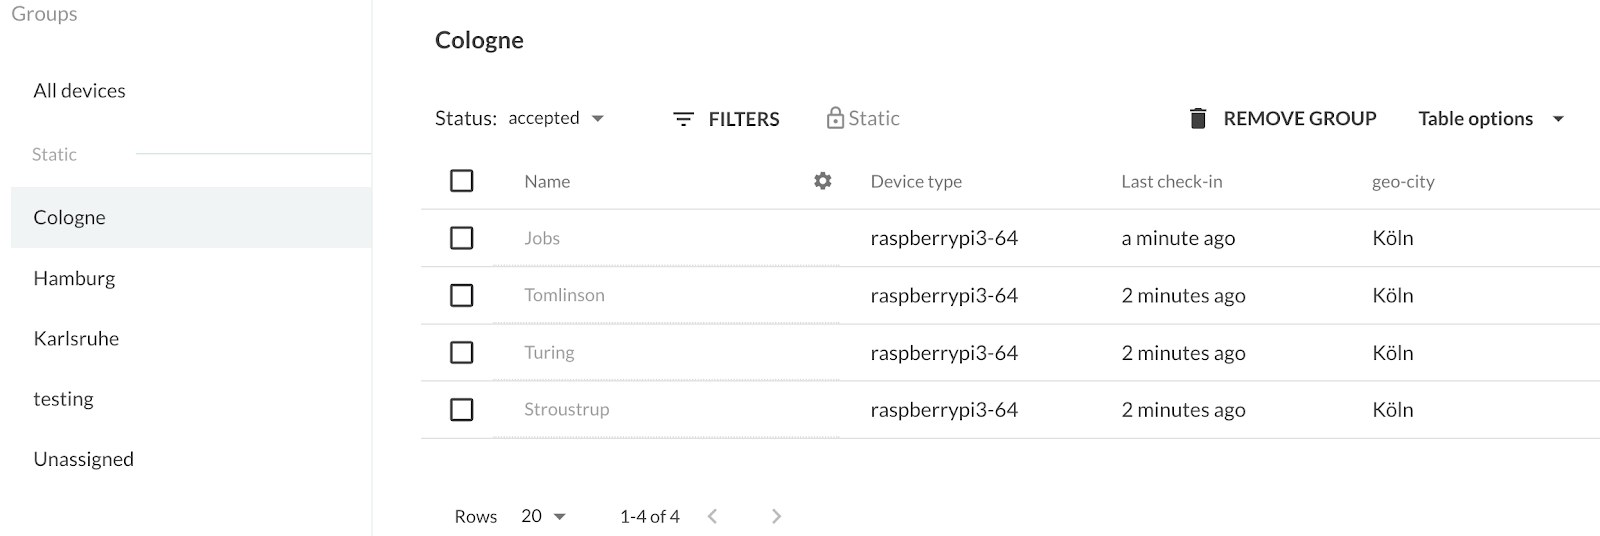 Figure 3: Mender Web UI showing the Cologne device group
Depending on the type of the Mender artifact, it contains a full Linux image or a customizable set of application data. Included in both cases is additional metadata, such as the target architecture. This is necessary because the management server should be able to decide which clients are compatible with an update. Signing of the artifacts is required for authenticated updates. Releasing updates can be limited to groups.
Scheduled deployments are part of the Mender professional plan and enable fine-grained control of the update process.
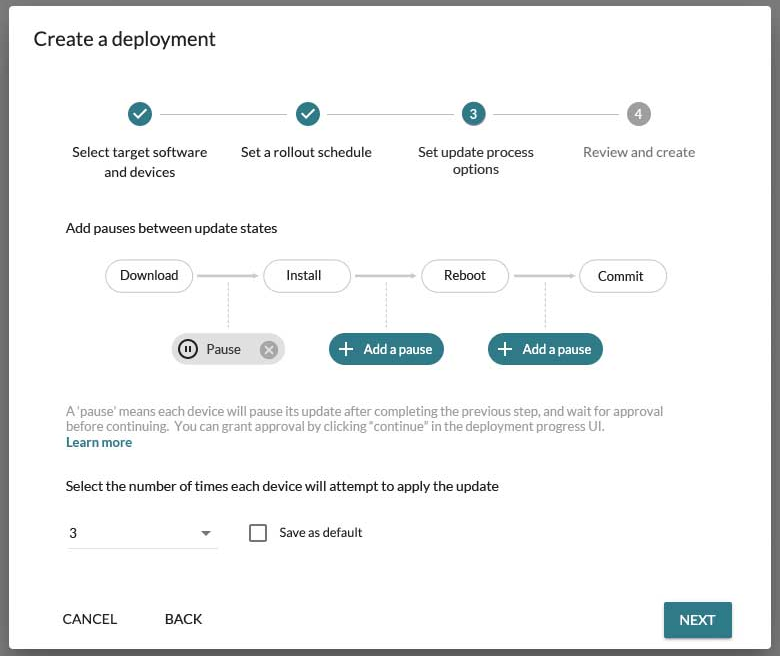 Figure 4: Scheduling update deployments
Embedded Flutter
Flutter is a multi-platform UI development framework. It is primarily targeting the prevailing mobile operating systems Android and iOS. Desktop (Linux, macOS, Windows) and the web (browser, V8) are also supported as well.
Flutter uses the Dart programming language, following a declarative approach for UI modeling. Instead of writing state transitions in an imperative style, this is handled by the framework.
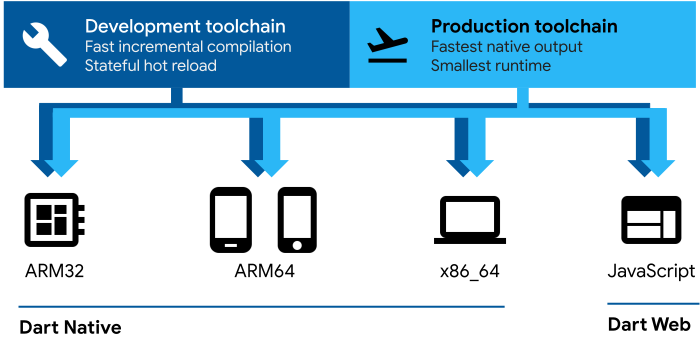 Figure 5: Platforms supported by the Dart compiler
Dart was initially aiming at web and JavaScript (dart2js). But since the early stages, Dart has evolved to target more platforms and has been aligned to the specific needs of the Flutter framework. By creating release builds, the dart compiler generates native machine code using ahead-of-time (AOT) compilation (dart2native) to provide more consistent startup times. During the development stage just-in-time (JIT) compilation can be used, cutting down the round trip time and enabling hot code reloading.
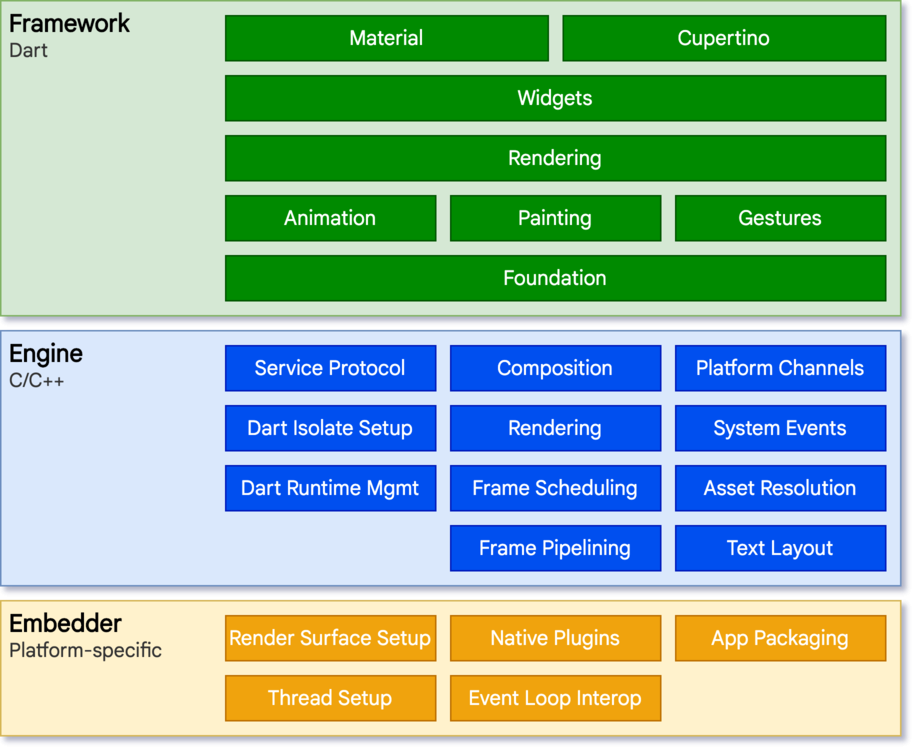 Figure 6: Architectural layers
By decoupling the framework, engine and embedder enable apps developed with Flutter to be run on different platforms without the need to change the Dart source code. A custom embedder can be implemented by adhering to a single C header file. This interface defines the minimum runtime requirements expected for an embedder implementation, like the app lifecycle or fundamental rendering capabilities. Features beyond this scope, e.g. camera access, can be implemented via Platform Channel. A Platform Channel communicates with JSON messages between Dart and platform-specific code.
The Flutter team officially supports major mobile and desktop platforms and maintains the corresponding embedders. Specialized embedders targeting devices like the Raspberry Pi have been created by the community:
We use the flutter-pi embedder, due to its use of Direct Rendering Infrastructure (DRI) eliminating the need for X or Wayland. This gives Flutter the capability to be started from command line and run in kiosk mode. A user cannot move the application to the background or open different applications.
Cross-compilation toolchain
The Raspberry Pi 3B and later versions are equipped with 64-bit ARM (aarch64) processors. Cross-compilation is needed when using a x86-64 development platform because it is not possible to run x86-64 binaries on aarch64 platforms without emulation. Despite the Flutter toolchain having cross-compilation support for Android and iOS, it is currently not possible to use it for targeting other desktop platforms. To use the default Flutter frontend server, the host platform needs to match the target platform. Since our development machine and CI pipeline are x86-64 machines, an alternative was required.
It is possible to instruct the Dart compiler to build aarch64 machine code, by using the Dart compiler frontend. But the engine and the embedder have to be compiled for the Raspberry Pi as well.
Until the cross-compilation situation improves, the following steps are necessary to run a release build of the application.
| Build step | Command | Output |
|---|---|---|
| Build release Flutter asset bundle | flutter build bundle | flutter_assets/ |
| Build Dart AOT kernel snapshot (DartVM) | dart frontend_server.dart.snapshot | kernel_snapshot.dill |
| Flutter AOT snapshot generation | gen_snapshot_linux_x64_release | app.so |
| Build flutter-pi embedder and cli | make -jnproc | flutter-pi |
Docker is a convenient tool for this task. It is possible to run the build tasks locally and by a continuous integration pipeline, by specifying all necessary steps in a Dockerfile.
When successfully built locally or in a CI context, the flutter_assets directory can be transferred to the Raspberry Pi with e.g. scp. One pitfall to avoid is the engine version mismatching the flutter version used to build the asset bundle when running flutter-pi --release flutter_assets. This is indicated by one one of the following errors at runtime:
- Invalid kernel binary format version
- Invalid SDK hash or Invalid engine hash
-
Details regarding the Flutter version can be shown by running flutter --version. Resulting output might be:
Flutter 3.0.1 • channel stable • https://github.com/flutter/flutter.git
Framework • revision fb57da5f94 (4 days ago) • 2022-05-19 15:50:29 -0700
Engine • revision caaafc5604
Tools • Dart 2.17.1 • DevTools 2.12.2
The revision hash, shown in the example, should match the engine version hash. If this is not the case, one needs to upgrade or downgrade the Flutter version used to build the application bundle to align with the engine version. Alternatively, a different Flutter engine version can be chosen.
Putting it all together
Instead of running the application on the host OS, it is wrapped in a Docker container, which also increases container and application interchangeability. But this is rather limited due to requirements for kernel modules by the application layer. For example, the host system needs to load the Raspberry Pi backlight device tree overlay, in order that the application can control the display brightness. This cannot be done in the container, as it does not have access to hardware. In addition to the application files, the container provides the runtime dependencies required by flutter-pi and the engine, such as fontconfig.
Conclusion
There is still room for improvement in the project with regards to the degree of automation and flexibility:
- Instead of relying on pre-built flutter engine binaries, doing this by yourself allows the usage of an arbitrary Flutter version. Faster adoption of newer Flutter versions is another advantage.
- The Sony embedder has broader device support and can be used in more traditional Linux desktop environments using X or Wayland display server. This allows for multiple windows to be visible at once. Using the Direct Rendering Interface is supported as well.
- Running the Docker without privileged permissions to circumvent access to the host system from a malicious container or app.
- Currently, the Mender artifact built and signed by the CI pipeline is uploaded manually using the Web UI. Automatic artifact upload after successful CI job execution can be achieved with the Mender API.
- Using the Raspberry Pi 4 Compute Module as new hardware revision, instead of relying on the aged Raspberry Pi 3, for instance because of the supply availability.
Moreover, Mender provides many features which we aren’t using at the time. These include delta updates or application monitoring. Due to the separation of concerns, editing or replacing a component should have limited consequences for adjacent components. Introducing the Raspberry Pi 4 or the Compute Module as a new platform to our fleet should have implications only regarding Yocto. In the same sense, the exchange of the Flutter embedder shouldn’t require refactorings to the application code or the Yocto build.
Next steps
Recent articles
New Mender experimental AI-enabled feature
Mender in 2025: A year in review with compliance, security, and AI-driven growth
What’s new in Mender: Enhanced delta updates and user experience
Learn why leading companies choose Mender
Discover how Mender empowers both you and your customers with secure and reliable over-the-air updates for IoT devices. Focus on your product, and benefit from specialized OTA expertise and best practices.
