Mender blog

NOTE: We have a more up to date version of this guide on Mender Hub. As Mender is an evolving project, some blog posts like this will inevitably become out of date.
Today we take a look at what is needed if we want to port Mender to a non-Yocto build system. Yocto does a lot of stuff behind the curtains that is supposed to make it easier to integrate Mender, so that users can focus on the features of their device instead of low level update details. When we bring the build out of Yocto's care, all these little details become exposed, and we need to know what they mean for the integration.
This will be a quite technical blog post, and a certain knowledge of embedded builds is assumed.
If you are using Raspbian on RPi3 or Debian on BeagleBone Black, you might want to read about the mender-convert tool for building a Mender Debian image available since 1.7.0
Partition layout
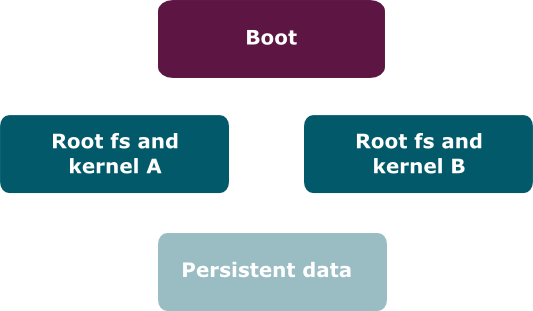
In order to create the proper image for the memory card using Mender, we require a particular partition layout, and the build system should make sure this is followed when creating the image.
It is possible to use other layouts, but the four main pieces, the boot partition, the two rootfs partitions, and the persistent data partition, all need to be there. Some aspects of the configuration may also change, such as references to the individual partitions.
The exact expected partition layout is:
- Partition 1: Boot partition, mounted on
/uboot - Partition 2: Rootfs A partition, mounted on
/ - Partition 3: Rootfs B partition, inactive, mounted on
/ - Partition 4: Extended partition
- Partition 5: Data partition (persistent data), mounted on
/data
Go support
The first thing we will inevitably need is support for the Go programming language, or Golang, since Mender is written in Go. This should be relatively straightforward if the build system runs on Linux and can download binaries. Simply download Go binaries from their download page and put it in a suitable location for calling later.
In the Yocto build, Go is in fact compiled from scratch, which is a bit of a chicken and egg problem, since Go is itself written in Go. However, this is only true for Go 1.5 and later. Yocto gets around this by compiling Go 1.4 using a C compiler, and then using that to compile later versions of Go. This is not required however, unless you need to compile from source for other reasons. The binary download should work just fine for most setups.
At the time of writing, the latest Go version, and the one suitable for compiling Mender, is Go 1.7.3.
The Mender program
Compiling Mender
Go enforces a specific directory layout when compiling programs, so it is important that the mender repository is cloned in a directory structure that ends like this: src/github.com/mendersoftware/mender.
A normal Go build is initiated with go build, but it is recommended to call make instead in order to gain some automatic build steps such as automatic version strings.
Configuring Mender
Mender comes with several configuration files that are important for it to function. This should appear in the rootfs filesystem in the locations specified below.
-
/etc/mender/mender.conf: There is an example of this file in the mender repository, but I would recommend grabbing it from the meta-mender repository instead, since this will give you the file actually used in Yocto builds, and hence more up to date. You'll need to substitute the values inside the file with appropriate values though. The rootfs entries are references to/dev/mmcblk0p2style device names, theServerURLrefers to the Mender server you wish to use, and theServerCertificateshould contain the path to the server certificate (covered below). -
/etc/mender/tenant.conf: At the time of writing this file should be created, but can simply be empty. -
/etc/mender/server.crt: This file should be the server certificate. A testing certificate can be grabbed from the meta-mender repository, but for a production certificate you need to generate your own. -
/usr/share/mender/identity/mender-device-identity: Grab this script from the meta-mender repository. -
/usr/share/mender/inventory/*: Grab all themender-inventory-*scripts from the meta-mender repository and put them here.
Installing Mender
Mender should be installed into /usr/bin on the resulting device image.
/etc/fstab
In addition to common entries such as the root filesystem, the /etc/fstab file needs to contain the following entries:
/dev/mmcblk0p1   /uboot               auto       defaults,sync,auto    0  0
/dev/mmcblk0p5   /data                auto       defaults,auto         0  0
The two partitions need to match the partitions in your layout that contain the U-Boot environment file and the ext3/ext4 data partition, respectively. See the official partition layout for more information.
Note that if you're not using U-Boot, the /uboot partition may not be necessary.
/etc/mender/artifact_info
In /etc/mender/artifact_info there should be a single line:
artifact_name=<artifact_name><artifact_name> can be anything, please see the documentation for MENDER_ARTIFACT_NAME.
/data/device_type
In /data/device_type there should be a single line:
device_type=<device_type><device_type> should be a string that uniquely identifies a group of devices. See the documentation for MENDER_DEVICE_TYPE.
Systemd
Systemd is required for Mender. In order for Mender to start correctly under systemd, this service file should be installed in /lib/systemd/system.
It is also possible to provide your own traditional SYSV script if this is desired, but this is an unsupported configuration, even under Yocto.
U-Boot
 Now we're getting into the advanced stuff! U-Boot is one of the trickiest parts to integrate in the build. We need to patch U-Boot to support Mender's automatic partition selection and rollback features, as well as provide some auxiliary files.
U-Boot environment
U-Boot needs to store its state, which is called its "environment", to persistent storage during upgrade procedures. We need to provide a skeleton of this file on the boot partition (which should not be confused with /boot on the Linux filesystem, this partition is mounted on /uboot). To do this we need to select an environment size. See the section on the boot environment file for details on how to select this. When a suitable size has been obtained, a file called uboot.env of exactly that size needs to be created in the root of the boot partition. The content is not important, it can be all zeros; U-Boot will fill in this file when the time comes, but it does need to be preallocated on the file system.
config_mender_defines.h
config_mender_defines.h is a special file used by Mender during compilation to provide configuration values to U-Boot supplied by the build system. This file is autogenerated during a Yocto build, but we need to generate it ourselves for our third party build system.
We can begin by taking a look at how it's generated in Yocto (look for the line containing config_mender_defines.h and all the lines up to the next EOF). The defines being made here all come from various configuration options in Yocto. Below I have put an example of what this looks like when it's filled out:
/* Shell variables */
#define MENDER_BOOT_PART_NUMBER 1
#define MENDER_ROOTFS_PART_A_NUMBER 2
#define MENDER_ROOTFS_PART_B_NUMBER 3
#define MENDER_UBOOT_STORAGE_INTERFACE "mmc"
#define MENDER_UBOOT_STORAGE_DEVICE 0

/* BB variables. */
#define MENDER_STORAGE_DEVICE_BASE "/dev/mmcblk0p"

/* For sanity checks. */
#define MENDER_BOOTENV_SIZE 0x20000
The three first entries are simply partition numbers, and the two entries containing UBOOT describe how to refer to the storage device using U-Boot's syntax. In this case we refer to the MultiMediaCard interface, or MMC, and we select the first (0'th) such slot. The MENDER_STORAGE_DEVICE_BASE is the string which the Linux kernel uses to refer to the MMC storage, excluding the partition number. And finally, the MENDER_BOOTENV_SIZE is the size of the U-Boot environment file, which I described in the previous section.
Patches
The way the build layer for Mender is organized is that it is split into cross platform and board specific patches. In the U-Boot build, you need to start by applying the two patches:
0001-Generic-boot-code-for-Mender.patch0002-Integration-of-Mender-boot-code-into-U-Boot.patch
Both can be found inside the meta-mender repository and they represent the cross platform part of the patches.
In addition to the cross platform patches you'll also need patches specific to your board. Patches for the officially Mender supported boards can be found inside the layer for each board, such as this one, but for your own board you have to make a board specific patch. Luckily, the procedure here is the same as for a Yocto build, so you can follow the guide for Integrating with U-Boot (you can skip reading the "Forks of U-boot" section, but everything else should be relevant at the time this post was written).
Compiling
You should now be ready to compile U-Boot! This process is covered under "Building the Software" inside the README file in the U-Boot source tree, so I will not go through it here. How to integrate the resulting boot loader image is board specific, and needs to follow the procedure for the board you are building for.
u-boot-fw-utils
In addition to the U-Boot boot loader image, some user space Linux tools are also needed, called "u-boot-fw-utils". Compiling these is simple: Just use the exact same sources you used for U-Boot, with the same patches, and run make env. The resulting binary, tools/env/fw_printenv, should be installed in the rootfs image twice, once as /sbin/fw_printenv and once as /sbin/fw_setenv. The tool uses the binary name as an indication of which operation to perform.
/etc/fw_env.config
In order for the fw-utils to find the environment the environment file, we need to provide a configuration file called /etc/fw_env.config. This file should have exactly one line containing:
/uboot/uboot.env 0x0000 ${BOOTENV_SIZE}where ${BOOTENV_SIZE} is the size of the environment file, as described earlier.
Symlinks to data partition
In the rootfs image, a symlink, /var/lib/mender, should be made to point to /data/mender.
Memory card image
If you tie all the pieces we just talked about together, and make a raw partitioned image out of it, according to the partition layout, then this is what will serve as the initial image to flash to the device (the "factory" image). However, we will also need...
Artifacts
Mender would not be much good unless we could also provide updates to the image we just made. To do this we need the artifacts tool.
 The artifacts tool, like Mender, is written in Go, and after cloning it from https://github.com/mendersoftware/artifacts it can be built by the simple
 go build command. The resulting artifacts binary is what we will use.
The primary input to the tool is the ext3/ext4 filesystem image that comprises the rootfs. In addition we need to provide some metadata about the image. Here is an example invocation of the tool:
artifacts write rootfs-image \
    -n <artifact_name> -t <compatible_devices> \
    -u <rootfs-image.ext4> \
    -o <name-of-update>.mender
<artifact_name> has the same meaning as the as described earlier. The <compatible_devices> string does too, except here it is possible to specify multiple device types, separated by commas, if the update is compatible with more than one device type. <rootfs-image.ext4> is the name of the rootfs you have built, and finally <name-of-update> is the name of the file that holds the update, with a .mender extension. This will be the output file and this file can be uploaded to the Mender server.
Conclusion
And that's it! At this point you should have both an image for the memory card, as well as a .mender artifact file that you can use to do updates. Ultimately it is the build system's responsibility to handle most of the details we've just been through, and if you find a way to integrate them into your build system, feel free to share it, so others can benefit!
Good luck!
Recent articles

Ambition is outpacing preparedness: Immature infrastructure projected to fail within five years
Explore the growing complexity of IoT device management and the challenges OEMs face with infrastructure, compliance, and product launches in the latest industry report.

The EU CRA regulation: Three key considerations any international company needs to know
The EU Cyber Resilience Act (CRA) requires a holistic approach to security compliance for connected products. Discover key considerations from Northern.tech and STMicroelectronics.

CVE-2026-49009 & CVE-2026-33552 - Input sanitization and access control issues in Mender Server
Two security vulnerabilities recently discovered and fixed in Mender Server.
Learn why leading companies choose Mender
Discover how Mender empowers both you and your customers with secure and reliable over-the-air updates for IoT devices. Focus on your product, and benefit from specialized OTA expertise and best practices.