Considerations for managing a Raspberry Pi-based device in production

Introduction
This article offers a short investigation into the prospect of putting and managing a Raspberry Pi in production with a commercial product. This involves finding out whether it is feasible or not to ship your product with a certain Pi model embedded inside. If you decide to do so, what considerations and configurations should be factored in by the time you ship the devices into the field?
Is the Raspberry Pi suitable for production?
For the purposes of this article, one can imagine rolling out an application at the scale of a medium-sized business. A new product with design specifics needs to be developed quickly with approximately 200 devices shipped into the field. In this scenario, using the Pi in production for a small to medium sized fleet is viable. The Pi’s affordability, the strong open source community support; and the significant hands-on experience that many developers have with the Pi make it a great choice. There is one downside to note, at the time of writing, sourcing the Pi in these quantities is challenging.
In general, when first starting up the project, it is quite common to use an SD card for mass storage support in a Pi. SD, however, should be avoided for a production device. SD cards, and consumer grade ones in particular, have a rather limited “write endurance”. This means that every time a write access is made to the card, its remaining lifetime reduces. Additionally, SD cards often suffer from poor reliability under challenging conditions such as unreliable power. Instead, more robust storage like a hard drive or an industrial grade eMMC should be selected for the project.
Device consideration #1 - Software updates in the field
Once your device is shipped out into the field, decisions that are made in the product development stage should not curtail the future value of the connected device. You will want the possibility to actually ship the hardware, and then develop and send updates from the evolving software stack AFTER THE device has been produced, shipped and connected in the field. Vulnerabilities may also be discovered after the device has gone into the field so there must be a reliable way to patch them. This is where Over The Air (OTA) software updates come into consideration. OTA updates make it possible to add new features to your product, fix bugs, and patch security vulnerabilities in the field.
In general, there are a couple of approaches taken by the available off the shelf solutions out there, where a few different applications need to be taken into account. At the lowest level sits the bootloader, which only in rare circumstances needs to be updated. Then comes your operating system, and finally your application. The safest way to ensure that your device will always be in a reliable state is to use an A/B partition scheme. Even though this is costly when it comes to memory space, it has the benefit of atomic updates, and automatic rollback to a formerly known state, if things were not to behave in the field, as they did in the proof of concept “lab” phase.
This tutorial will show you how to prepare a Pi for OTA updates.
You should also consider the security of your devices. The communication with the device should be encrypted, as well as ensuring that the provider of the update is verified. In general, this can be solved via regular https encrypted traffic, and certificates. If your needs for verification are more stringent, then public key cryptography signatures of your updates and a secret private key should be used. When a user interacts with a device to deploy updates, the connection should be HTTPS encrypted with TLS. To authenticate with the updates server, a user should log in by presenting a valid email address and password, as well as a Two Factor authentication code. The client used to log in should receive a JWT token with a default expiration time of one week. As an additional layer of security a Role Based Access Control capability can also be used to limit and control authorization of users.
Read-only rootfs
As a rule, you will want as few moving parts on your system as possible. Every opportunity for modification adds another unknown which increases the probability of changing the known state of your system down the line. For a desktop system this might not be problematic, but for embedded devices, these probabilities add up, and makes undesirable events inevitable at some point.
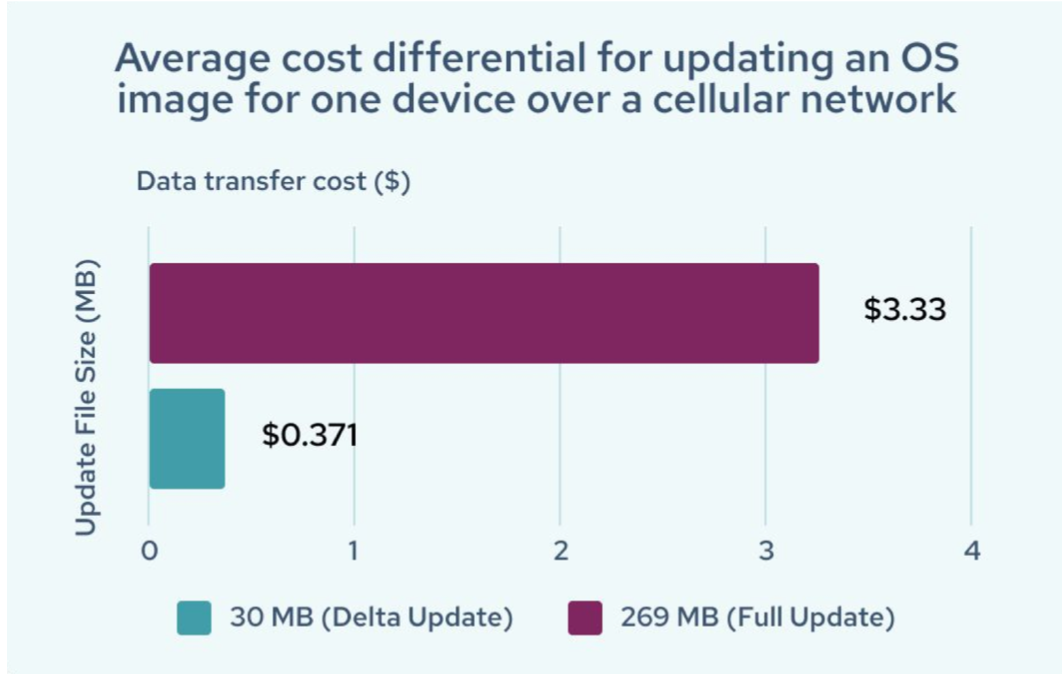
That is why running with a read-only rootfs setup makes so much sense: This keeps your persistent data on a separate partition. This also enables powerful capabilities such as delta updates. Delta updates or differential updates, bring data savings, which is beneficial if you are performing updates over an LTE cellular network or satellite which creates transfer costs.
 Figure 1: Reduce data transfer costs over cellular networks with delta updates. Source
Once a fleet of devices are in the field, certain operational insights will help you rest easy and ensure the devices are healthy. Some general, but simple metrics to monitor and control the health of your application running on the device such as getting notified if the systemd service running the application has stopped, or if it is repeatedly stopping and restarting. Other parameters which can save you a lot of headaches are to monitor resources such as memory usage, CPU usage, and network connectivity. To achieve this, a service running on your devices which reports back on discrepancies is recommended. Mender offers a simple monitoring solution, which you can use to set up monitoring of all the aforementioned metrics.
Setting up monitoring of a systemd service running our application with Mender Monitor is as simple as adding a file with the contents:
SERVICE_NAME="<name-of-systemd-service-file-in-question>"
SERVICE_TYPE="systemd"
Device consideration #3 - Remote troubleshooting
Chances are that your application will also have issues at some point. When this happens, having secure remote access to the device having the problem is critical. To address this, the Mender troubleshoot add-on comes with device diagnosis and allows you to fix issues with the help of audit logs, access approvals, and role-based user controls.
Device consideration #4 - Raspberry Pi Hardware Watchdog
Even with all the aforementioned boxes ticked, if you want to handle kernel crashes or other unexpected corruptions, it is recommended to enable the hardware watchdog on your device. The hardware watchdog is an underappreciated feature of the Pi3 and Pi4 devices and it should be a mandatory capability to avail of. If there are problems with the hardware or software and this freezes the device in the field, there would be nothing you can do remotely to fix the problem.There is no outside action you will be able to take to rescue the device in the absence of the hardware watchdog. A watchdog on your Raspberry Pi4 is a crucial safety net to have installed before shipping your device off into the field.
A Raspberry Pi hardware watchdog is a specialized piece of hardware device integrated into the Pi 4. It will reboot the device, once it is not ‘kicked’ by the running software on the device, within a given timeframe. In addition to having a standard watchdog reboot the device in case of the device freezing, more advanced watchdogs should also be considered. In certain situations, your wifi driver could freeze up, leaving you unable to access the device. A watchdog on your wireless device interface, will reboot the device and hopefully fix up your network issues - so there is no hands-on effort required. In other scenarios, some application on the device might leak memory, and grind your device to a halt. Or some other application could be consuming all the available CPU power.
Please note that the watchdog software does not come pre-installed on the standard RaspiOS distribution, and needs to be installed:
sudo apt install watchdogAlso remember to enable the firmware for the watchdog in your /boot/config.txt file:
dtparam=watchdog=onRemember to configure the service file:
echo ‘watchdog-device = /dev/watchdog’ >> /etc/watchdog.conf
echo ‘watchdog-timeout = 60’ >> /etc/watchdog.conf
And enable it:
ln -s /lib/systemd/system/watchdog.service /lib/systemd/system/multi-user.target.wantsMore advanced watchdog strategies can be configured to monitor a range of different health parameters on the device and reboot if the metrics are not what is expected. Please read this article for more information on how to configure the hardware watchdog on your Pi.
Device requirement #5 - Operational hardening for Raspberry Pi
Some further work in Raspberry Pi hardening is advised, since the device is going to be sent out into the great unknown.These key precautions to be taken include:
- Review open ports, and shut down everything which is not needed,
- Review user and file permissions. A look into SELinux will help you secure your sensitive files, and keep unwanted programs out of files they are not supposed to access,
- Review the sudo settings on the device,
- Install a firewall on the device.
Check out this blog post for even more information on considerations before sending a device out into the field.
Please note that these considerations apply mostly to a Raspberry Pi OS-based device (Raspbian), respectively a Debian or Ubuntu-based software distribution. An alternative means to create a hardened Linux distribution is by using the Yocto Project.
Using the Raspberry Pi used in industrial products
For industrial/large scale fleet rollouts, it is recommended to have a look at the compute module as opposed to the regular single board computer form found in the Pi4. The compute module comes in a smaller form factor, and a lot more variations, allowing you to have the same compute power in a smaller package. This makes your product smaller and sleeker in form size, and more robust.
Conclusion
Creating your own product based on the Raspberry Pi will work for a small to medium-sized fleet but some essential features must be supported. To summarize, the following boxes on the checklist should be ticked: put an infrastructure for system and application software updates to keep the device primed, operational and secure; put monitoring and troubleshooting tools in place, a hardware watchdog should be enabled, and key precautions in place to harden the device. You can rest assured that ample community support will be there for you to help you out along the way.
You may also be interested in these key tutorials from the Mender Hub community forum:
Recent articles
New Mender experimental AI-enabled feature
Mender in 2025: A year in review with compliance, security, and AI-driven growth
What’s new in Mender: Enhanced delta updates and user experience
Learn why leading companies choose Mender
Discover how Mender empowers both you and your customers with secure and reliable over-the-air updates for IoT devices. Focus on your product, and benefit from specialized OTA expertise and best practices.


