Mender blog

In this post we're going to explore using LVM to reduce the space needed by a dual rootfs setup. In a typical dual rootfs setup, the device needs to have two times the space needed by the rootfs partition, in order to have an inactive partition to stream a new update into. But in a typical patch update, not that much will have changed from what's already on the active partition. Perhaps a few libraries got a patch update, maybe some data files got an update, but most files will remain the same. What if we could take advantage of that?
What is LVM?
LVM stands for Logical Volume Manager, and is a layer which sits on top of physical storage devices, abstracting away their complexity. It is essentially an alternative to regular disk partitions, which are much more flexible and robust. Using LVM one can for example combine three harddrives into one logical partition. In LVM, each such partition is called a volume.
It has a lot of other uses as well, such as RAID, but we will mainly concern ourselves with one particular feature of LVM: making snapshots.
LVM snapshots
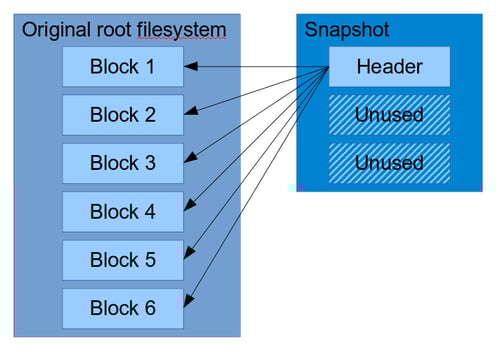
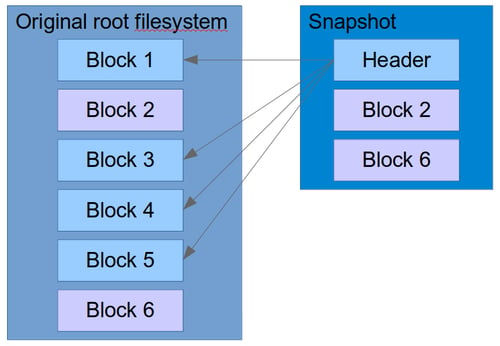
Snapshots are a way to take a snapshot in time of a block device. For example you can take a snapshot of your root filesystem, and it will not change, even if you keep using your original root filesystem. The way this works is by using Copy-On-Write (COW), which means that initially, the snapshot starts out with no blocks of its own, and takes practically no space, only a few header blocks. As the main filesystem is being written to, LVM needs to keep the original blocks, and these original blocks are written into the snapshot. After a while, the snapshot will have accumulated a mix of blocks that have been written to it, and pointers to unchanged blocks in the original rootfs filesystem.
Here is an illustration of how the snapshot would be structured right after it is created:
As can be seen, most of the space in the snapshot is unused, it simply refers to blocks in the original filesystem. After a while, the snapshot will have to make copies of blocks that are changing, and might look more like this:
Of course, if you read back the snapshot from its block device, you will not see any of this fragmentation. LVM presents it as one coherent and contiguous block device: the original snapshot.
Snapshots have an important property which we are going to use: They can also be written to! This works more or less the same way: Any block you write to in the snapshot will make a copy of the original block, so that changing the snapshot does not change the original. We are going to use this to write a new rootfs update into the snapshot.
The update flow
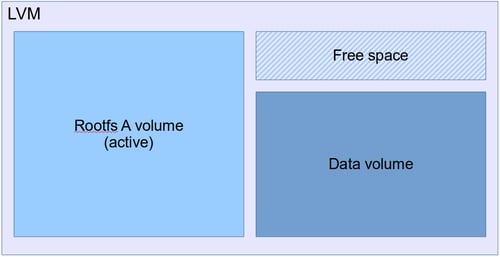
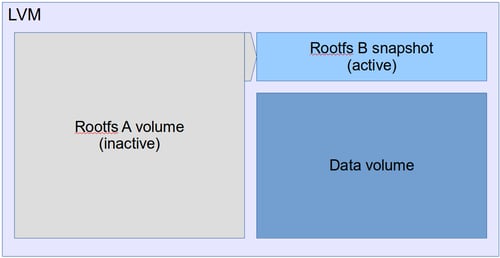
Let's take a look at what will actually happen during an update. The LVM volume layout will initially start out like this:
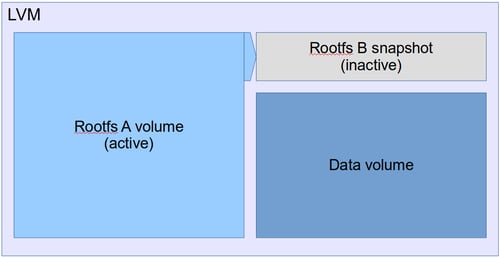
Once an update starts, a snapshot is created of the active partition, which becomes Rootfs B.
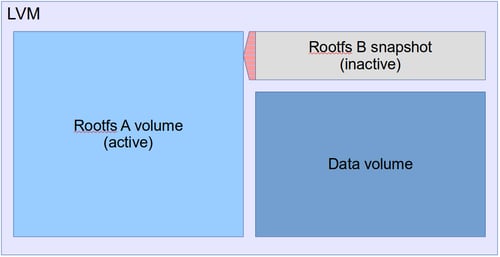
As usual when a rootfs update has been installed, we swap the active and inactive volumes, and boot into the snapshot, which is now the new active volume.
This is where things start to diverge from traditional rootfs update. First of all, we are now running in a somewhat unstable environment. If we start writing a lot of data to the active volume, the snapshot, then it will fill up, and once it is full and can take no more data, the snapshot becomes invalid. Hence, not overfilling the snapshot is a necessary condition for committing the update, and if we do overfill it, we have no choice but to roll back.
Secondly, we are running directly from an LVM snapshot. There is no way to convert a snapshot into a regular volume. Instead, what we need to do to make the snapshot content permanent, is to merge the snapshot into the original, and then switch back to the original. This means we have to reboot a second time once we are ready to commit. Once we have initiated the merge, and rebooted, the snapshot is in a "merging state":
There may be quite some data to write from the snapshot to the main filesystem, but LVM will finish this writing in the background, and from Mender's perspective, we have now committed, and it is no longer possible to go back.
Some time later, once the snapshot is fully merged, we have returned to the original state, where the snapshot space is free:
Configuring the build
Enough theory! How to do this in practice?
We are going to a Yocto Project build together with Mender for our purposes. The first thing we need to do is to build an image which is laid out using LVM, instead of traditional partitioning. And here we already hit our first hurdle: Creating LVM volumes, and the Volume Groups that contain them, requires root access! For now, we're just going to write a script which we can call outside of Yocto with sudo. Using sudo inside Yocto is not possible because it executes in its own environment, so even if you have previously input the password, it won't use it.
Basic configuration
For this experiment we have used the qemux86-64 MACHINE type, as defined by Yocto, and combined that with the meta-mender-qemu layer.
We apply some basic configuration in our local.conf:
MENDER_STORAGE_DEVICE_BASE = "/dev/devicevg/rootfs"
MENDER_ROOTFS_PART_A = "${MENDER_STORAGE_DEVICE_BASE}1"
MENDER_ROOTFS_PART_B = "${MENDER_STORAGE_DEVICE_BASE}2"
MENDER_STORAGE_TOTAL_SIZE_MB = "1024"
MENDER_BOOT_PART_SIZE_MB = "128"
MENDER_BOOT_PART = "/dev/hda1"
MENDER_DATA_PART = "/dev/devicevg/data"
Note in particular the use of the devicevg name; this is the name of the Volume Group that will be created inside the LVM image.
Creating the LVM
I wrote a script we will use, called make_lvm.sh. You can take a look at make_lvm.sh in the "using-lvm-to-reduce-dual-rootfs-footprint" branch, but to get the key points, here is what it does:
- Create an image the same size as the original
uefiimgfrom Yocto. - Put the boot partition in the same location (this has to live outside of LVM).
- Use the rest of the space for an LVM Volume Group (VG), which will host our Logical Volumes (LVs).
- Create an LV for Rootfs A and the Data partition, but not for Rootfs B. This leaves some empty space, which we will use for the snapshot later.
Here's how we can call it from the command line:
cd $BUILDDIR
bitbake core-image-full-cmdline
sudo ../meta-mender/meta-mender-core/recipes-mender/lvm-um/files/make_lvm.sh \
    -i tmp/deploy/images/qemux86-64/core-image-full-cmdline-qemux86-64.uefiimg \
    -o tmp/deploy/images/qemux86-64/core-image-full-cmdline-lvm-qemux86-64.uefiimg \
    -s rootfs1,$((450*1048576)) \
    -s data,$((400*1048576))
The first two parameters are input and output image, respectively, and in the last two parameters we give the sizes that we want for the rootfs1 and data volumes, 450MiB and 400MiB, respectively. Since the full image is 1GiB, and the boot partition is 128MiB, this leaves approximately 46MiB for the snapshot, but some of that is inevitably lost to various partition and LVM meta data.
Having executed this, we are left with this output at the end, which describes the partition layout, the Volume Group info, and the Logical Volume info:
OUTPUT: -----------------------------------------------------------------------
Disk /dev/loop1: 1 GiB, 1073741824 bytes, 2097152 sectors
Units: sectors of 1 * 512 = 512 bytes
Sector size (logical/physical): 512 bytes / 512 bytes
I/O size (minimum/optimal): 512 bytes / 512 bytes
Disklabel type: gpt
Disk identifier: 1AB8A51B-318E-449B-828D-2176B6B1EDC7

Device        Start     End Sectors  Size Type
/dev/loop1p1  16384  278527  262144  128M EFI System
/dev/loop1p2 278528 2097118 1818591  888M Linux LVM
-------------------------------------------------------------------------------
  VG       #PV #LV #SN Attr   VSize   VFree
  devicevg   1   2   0 wz--n- 884,00m 32,00m
-------------------------------------------------------------------------------
  LV      VG       Attr       LSize   Pool Origin Data%  Meta%  Move Log Cpy%Sync Convert
  data    devicevg -wi-a----- 400,00m
  rootfs1 devicevg -wi-a----- 452,00m
-------------------------------------------------------------------------------
The new image can then be booted with:
cd $BUILDDIR
../meta-mender/meta-mender-qemu/scripts/mender-qemu core-image-full-cmdline-lvm
Kernel location and initrd
Trying to boot the image from above quickly reveals that it is not working, the bootloader cannot find the kernel. This has been solved in the "using-lvm-to-reduce-dual-rootfs-footprint" branch by setting both mender_kernela_part and mender_kernelb_part to 1.
However, even that is not enough, as the kernel can not find the root filesystem. The reason for this is that the kernel cannot auto-detect LVM volumes. They need to be scanned and activated in userspace, and for that we need to use an initrd. So we also need to enable initrd_imagetype=initrd and make some change to our local.conf:
IMAGE_BOOT_FILES = "bzImage core-image-minimal-initramfs-qemux86-64.cpio.gz;initrd"
IMAGE_INSTALL_append = " lvm2 lvm-um"
INITRAMFS_SCRIPTS_append = " initramfs-module-lvm"
PACKAGE_INSTALL_append_pn-core-image-minimal-initramfs = " lvm2"
PACKAGECONFIG_remove_pn-lvm2 = "thin-provisioning-tools"
These settings make sure that the kernel appears on the boot partition (not usually the case with meta-mender), and that all the LVM tools and scripts are available in the initrd.
Following this we need to build two image recipes, first core-image-minimal-initramfs to build the initrd, and then core-image-full-cmdline which is the uefiimg where the initrd will be included:
bitbake core-image-minimal-initramfs
bitbake core-image-full-cmdline
LVM activation bug
The next hurdle that I encountered was that systemd does not pick up that the data volume has been activated, and hangs when trying to mount it, eventually timing out and going into maintenance mode. It is not clear why this happens, but it's possible that it's a Yocto specific bug when using systemd, initrd and LVM together. We will work around it in this post by using this method. This simply deactivates and reactivates the Volume early in the boot process, which gets it going again.
The Update Module
Of course, to actually make an update using LVM snapshots, we can't just use the built-in updater in Mender, we need an Update Module which can perform the special steps for us. The Update Module is called lvm-um and is also part of the "using-lvm-to-reduce-dual-rootfs-footprint" branch. We will not go into the exact details of how it works, but these are its key properties:
- When an Artifact download starts, it will create a new snapshot of the currently running rootfs.
- While downloading, the module makes sure to write only the parts that are different to the snapshot (in 1MiB increments). This makes sure we do not copy blocks unnecessarily and fill up the space.
- When the download has finished, it switches the active volume to the snapshot and reboots.
- While running from the snapshot partition, we can do whatever we want, for example run
ArtifactCommit_Enterscripts. However, we must be careful not to use too much space or the snapshot will overflow and become invalid. - When we commit the Artifact, we schedule a merge of the snapshot, switch back to the original rootfs volume and reboot a second time.
- At this point the Artifact is committed!
But what happens in the case of rollback? Well, then the module simply switches back to the original rootfs volume without scheduling a merge, and deletes the snapshot afterwards.
The second reboot
Note that we had to reboot a second time to make this work. This is not something the Mender client ordinarily does, and in fact, by doing so, it will treat it as an error, and will try to roll back. Ideally the Mender Client should have an option for dealing with this, but for now, we will just hack the client into accepting a reboot in the ArtifactCommit state.
Launching the image
After we have done all of the above, we can build an image which contains the Update Module with:
cd $BUILDDIR
bitbake core-image-minimal-initramfs
bitbake core-image-full-cmdline
sudo ../meta-mender/meta-mender-core/recipes-mender/lvm-um/files/make_lvm.sh \
    -i tmp/deploy/images/qemux86-64/core-image-full-cmdline-qemux86-64.uefiimg \
    -o tmp/deploy/images/qemux86-64/core-image-full-cmdline-lvm-qemux86-64.uefiimg \
    -s rootfs1,$((450*1048576)) \
    -s data,$((400*1048576))
And then launch it in QEMU using:
../meta-mender/meta-mender-qemu/scripts/mender-qemu core-image-full-cmdline-lvmMaking an Artifact
From here we can make a test update. We use mender-artifact to create a snapshot of the currently running rootfs, make some small modification to it, and then craft a new Artifact which we can install with the lvm-um Update Module.
Snapshot the currently running rootfs:
mender-artifact write rootfs-image \
    --device-type qemux86-64 \
    --artifact-name new-update \
    --file ssh://root@localhost:8822 \
    --output-path new-update.mender
Copy something into it so we can see the change after an update:
echo "We updated!" > update-file.txt
mender-artifact cp update-file.txt new-update.mender:/update-file.txt
We don't have a dedicated Artifact generator for the lvm-um Update Module yet, so let's create one manually by disassembling the rootfs-image Artifact:
tar xOf new-update.mender data/0000.tar.gz | tar xz
mv rootfs.tmp* rootfs
mender-artifact write module-image \
    --device-type qemux86-64 \
    --artifact-name new-update \
    --file rootfs \
    --type lvm-um \
    --output-path new-lvm-update.mender
Now copy this Artifact over to the data volume on our emulated device, and we are ready to try it:
scp -P 8822 new-lvm-update.mender root@localhost:/dataInstalling the update
On the device, we can now install the Artifact:
mender install /data/new-lvm-update.menderWhich results in the following:
INFO[0000] Loaded configuration file: /var/lib/mender/mender.conf
INFO[0000] Loaded configuration file: /etc/mender/mender.conf
WARN[0000] Could not resolve path link: /dev/devicevg/rootfs2 Attempting to continue
INFO[0000] Mender running on partition: /dev/mapper/devicevg-rootfs1
INFO[0000] Start updating from local image file: [/data/new-lvm-update.mender]
Installing Artifact of size 103428608...
INFO[0000] No public key was provided for authenticating the artifact
INFO[0000] Update module output: File descriptor 8 (/data/mender/mender-store) leaked on vgs invocation. Parent PID 1214: /bin/sh
INFO[0000] Update module output: File descriptor 9 (/data/mender/mender-store) leaked on vgs invocation. Parent PID 1214: /bin/sh
INFO[0000] Update module output: File descriptor 8 (/data/mender/mender-store) leaked on lvcreate invocation.
INFO[0000] Update module output:  Parent PID 1214: /bin/sh
INFO[0000] Update module output: File descriptor 9 (/data/mender/mender-store) leaked on lvcreate invocation. Parent PID 1214: /bin/sh
INFO[0000] Update module output:   Logical volume "rootfs2" created.
........................................................................ - 100 %
Use -commit to update, or -rollback to roll back the update.
At least one payload requested a reboot of the device it updated.
Then reboot the device. If everything went well, we should now be running the snapshot, rootfs2, which we can verify with this:
# mount | grep ' / '
/dev/mapper/devicevg-rootfs2 on / type ext4 (rw,relatime)
# cat /update-file.txt
We updated!
If we now run:
mender commitWe notice that it reboots automatically, and this is part of the special hack we did earlier to reboot twice. But before the reboot messages, we get these messages from the Update Module, indicating that it has scheduled the snapshot merging:
INFO[0000] Loaded configuration file: /var/lib/mender/mender.conf
INFO[0000] Loaded configuration file: /etc/mender/mender.conf
INFO[0000] Mender running on partition: /dev/mapper/devicevg-rootfs2
Committing Artifact...
INFO[0000] Update module output: File descriptor 8 (/data/mender/mender-store) leaked on lvs invocation.
INFO[0000] Update module output:  Parent PID 1244: /bin/sh
INFO[0000] Update module output: File descriptor 9 (/data/mender/mender-store) leaked on lvs invocation.
INFO[0000] Update module output:  Parent PID 1244: /bin/sh
INFO[0000] Update module output: File descriptor 8 (/data/mender/mender-store) leaked on lvconvert invocation.
INFO[0000] Update module output:  Parent PID 1244: /bin/sh
INFO[0000] Update module output: File descriptor 9 (/data/mender/mender-store) leaked on lvconvert invocation.
INFO[0000] Update module output:  Parent PID 1244: /bin/sh
INFO[0000] Update module output:   Delaying merge since snapshot is open.
INFO[0000] Update module output:   Merging of snapshot devicevg/rootfs2 will occur on next activation of devicevg/rootfs1.
We can now check that we are back on the original partition.
# mount | grep ' / '
/dev/mapper/devicevg-rootfs1 on / type ext4 (rw,relatime)
However, to fully commit we need to run this a second time to resume committing, since the previous commit attempt was interrupted by the reboot:
mender commitNow we are fully committed, and we can check that with:
# mender show-artifact
new-update
# cat /update-file.txt
We updated!
What next?
What we have demonstrated is that it is possible to use the LVM snapshot feature to substantially reduce the space requirements for a dual rootfs setup. However, this is far from ready for being used in production, there are several issues that need to be solved first, and caveats we have not yet talked about.
Cleaning up
A lot of the changes needed for this to work ended up going into local.conf, which is not a good place for them to live. Ideally, the feature should only be turned on there, all other settings should be handled by the Yocto layer, and adapt to whatever settings are enabled. This could go into the meta-mender-core layer, but perhaps better is to put this in a dedicated layer, since this is not really core functionality.
In addition, some of the changes that I have put in the "using-lvm-to-reduce-dual-rootfs-footprint" branch are questionable, and will need to be further refined to be upstreamed.
sudo requirement
The fact that the image requires root privileges to build the image is also not good, and ideally this would be solved by some setuid image builder tool which can do exactly what we need in a safe manner. For example it could take a file similar to what wic uses, and then build an image in a root owned temporary folder, after checking read access on all the inputs.
Watchdog
Although it won't break the update, nor the LVM consistency, overflowing the snapshot beyond its capacity is not well handled by the operating system. Chances are more than likely that if you overflow the snapshot, then the system will crash. This is because once the snapshot is full, all reads and writes return error, which could easily crash or stall the system.
Therefore a watchdog is required under this setup to have any kind of resiliency, unless you are sure that a user is always available to trigger a manual reboot. Luckily, since the kernel should survive a snapshot error condition, a software watchdog should be good enough for this purpose. Once the watchdog has rebooted, the system will go back to the original partition and the Update Module will pick up that the snapshot has become invalid, and delete it together with rolling back the update.
Two reboots
Although two reboots in itself is not a deal breaker, the hack that we used to get the client to accept this is not production grade, and can cause the client to become stuck in a reboot loop if a new update crashes. Something smarter needs to be thought out here, for example extending the Update Module protocol so that the Update Module can tell the client it wants to reboot a second time.
Block shift
When we made the new update, we took an existing filesystem from the device and modified it. However, this is not how new images are typically built. They are usually built by assembling an image from scratch using Yocto, and therefore by a tool like mkfs.ext4. The problem with this is that it's possible that if a file is added, this file is not added at a free block somewhere near the end of the used blocks, as would be the case for a live filesystem. Instead it might be allocated near the beginning, causing all subsequent blocks on the filesystem to be shifted to a later sector. This happens because the image is brand new, it has no existing filesystem to take into account, and just arranges everything in the least fragmented way possible, which is almost never what happens to a live filesystem.
This completely destroys the benefits gained by using snapshots. Since the blocks are shifted, (nearly) every block is now different, because they don't line up with the originals anymore, causing us to fill up the snapshot space very fast, most likely overflowing it.
A way that this could be solved is to take the original image as input to the image builder, and instead of using a newly generated image, we copy the original image, and then use a tool like rsync to sync the file content instead. This would make the minimum number of changes and cause more fragmentation than making a fresh filesystem, but would not shift the unchanged blocks at all.
The disadvantage of this method is that it requires root (but we already require that), and that it can't pick up changes that are on the filesystem meta data level (at least not easily).
Future
Whether I will have time to solve the issues described above, only time will tell; this is merely a hobby/research project at this stage. However, I hope you enjoyed this little trip with LVM and learned something about what is possible to do with it!
Recent articles

Containerized software updates: How machine-agnostic infrastructure unleashes smart products for all
Discover how machine-agnostic infrastructure enables seamless software updates for AI-driven IoT devices, enhancing innovation and market reach across diverse environments.

Ambition is outpacing preparedness: Immature infrastructure projected to fail within five years
Explore the growing complexity of IoT device management and the challenges OEMs face with infrastructure, compliance, and product launches in the latest industry report.

The EU CRA regulation: Three key considerations any international company needs to know
The EU Cyber Resilience Act (CRA) requires a holistic approach to security compliance for connected products. Discover key considerations from Northern.tech and STMicroelectronics.
Learn why leading companies choose Mender
Discover how Mender empowers both you and your customers with secure and reliable over-the-air updates for IoT devices. Focus on your product, and benefit from specialized OTA expertise and best practices.