Using QEMU virtualized environments to develop and deploy embedded software for x86 Linux

Introduction
Before shipping software for embedded devices, it is crucial to test it on real devices, in an environment as close to the actual operating environment as possible. But that does not mean that development and testing necessarily has to happen this way. Running on real devices can often be tedious, time consuming and in some cases may be impractical.
This article will be a step-by-step tutorial on how to do virtual Mender deployments using the QEMU virtualized environment, as an alternative to using an actual x86 device. The goal is to enable rapid development, and the target audience is developers, with a focus on ease of use. The article will go through both advantages and disadvantages when using a QEMU Virtual Machine instead of a real device. The Mender Debian based build environment will be used as a basis for this tutorial.
Pros and cons of using QEMU
What are the advantages of using QEMU instead of a device?
- No fiddling with cables or memory cards to run on a device
- No waiting to write an image to an SD card
- Better performance (QEMU has access to your workstation CPU and memory)
- No physical network setup
- You can use your usual development setup, no need to visit the hardware lab
But there are also some disadvantages, and using QEMU is not a replacement for all device testing:
- Not all problems on a real device will manifest themselves in a Virtual Machine
- Conversely, some problems may only manifest themselves in a Virtual Machine
- Difficult or impossible to test special hardware, such as sensors
Requirements
Either a Hosted Mender account or a self hosted Mender server.
Hosted Mender is recommended for ease of use and application updates, but a self hosted server might be better if you are planning to do many full rootfs updates, since they use a lot of bandwidth.
The development environment
These are the requirements for the development environment:
- Using x86 architecture
- Running Linux
- These package installed:
- virt-manager
- git
- docker.io
- At least 80GB available
- Virtualization enabled in BIOS
If either virt-manager or docker.io were installed, make sure you log out and back in again to pick up the new group permissions.
About Linux
Although it is possible to utilize Linux in a Virtual Machine (VM) for this tutorial, it is not recommended. This is because the tutorial assumes we will run an additional VM from inside Linux, which may not perform well unless special measures are taken.
About virt-manager
If you’re having trouble installing virt-manager, make sure VMWare and VirtualBox are not installed.
vmware-installer -u vmware-player
dpkg –remove virtualbox
About Virtualization
The tutorial will work without this, but performance might be very poor. Enter the BIOS Setup when booting the workstation (often involves pressing Enter, F2 or Delete immediately after a hardware reset.). From here, try to locate a Virtualization menu item and make sure it is Enabled. Depending on your specific setup, the exact naming might vary and/or not be available. Check the corresponding documentation if in doubt.
Create the image
In this tutorial we will create an image completely from scratch, but if you already have an x86 compatible image that you are using for your device, you should be able to use that instead.
We are going to use Ubuntu as our base image, so start by downloading it from Ubuntu's home page. We will use the Desktop 20.04 installation ISO throughout the rest of the article.
Next, we are going to install it. Open a terminal, and execute this command to create an empty storage file:
qemu-img create -f raw hdimg.img 10GFor a standard Ubuntu install, 10G should be plenty, but you can adjust it to a different value if you expect to need more space. Just keep in mind that at least eight times this amount should be available on the development host after the image is created, because the image conversion we will do later uses a lot of temporary storage.
Start Virtual Machine Manager (virt-manager from the command line or Virtual Machine Manager in the menu, usually). This will give us an empty manager window like this:

Next, create a new VM by clicking the button at the top left corner. From this screen select the Import existing disk image option and proceed.

When selecting a disk image, if you don’t see the folder with hdimg.img anywhere in the file chooser, select Browse Local from the bottom of the window to navigate to where you created it, and then select it.

Then proceed to the next steps in the New VM window.

You can choose CPU and memory according to your needs, but choosing less than 1024MB of memory is not recommended for Ubuntu.
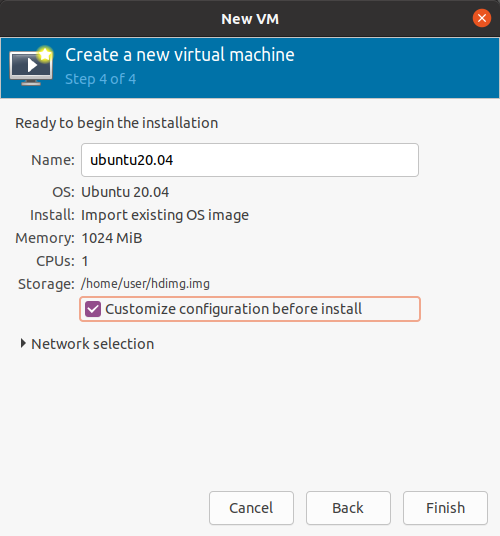
At the final screen, make sure you click the Customize configuration before install checkbox before clicking Finish.

On the next screen, under Overview, make sure that Firmware is set to UEFI.

Then we will select the storage to install from. Click the Add Hardware button, Storage from the list on the left, and the Select or create custom im storage. Make sure Device type is set to CDROM device and select the ISO image that was downloaded from Ubuntu earlier. This will be our installation source.

Click Finish to finish the creation and start the boot process. Press Enter as soon as the first boot logo shows up to Enter the VM BIOS setup. From here, enter Boot Manager.

Select to boot from the DVD-ROM.

From this point, proceed to install Ubuntu using normal install options. We won’t go through this in detail. since there is already plenty of information available on the Ubuntu wiki.
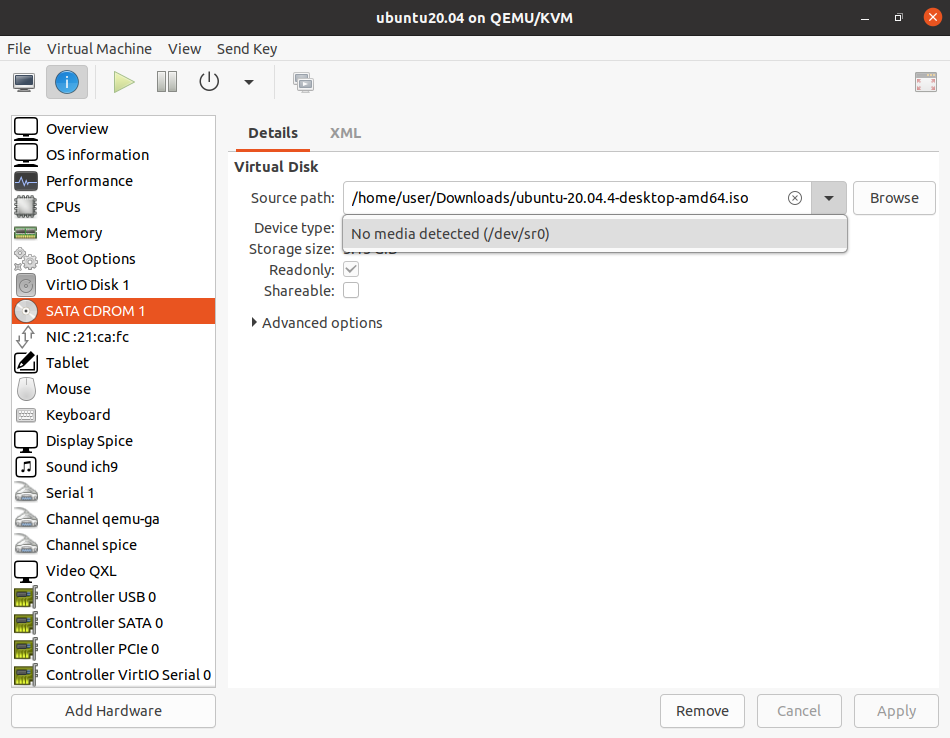
When the installation is finished and asking you to reboot, first remove the virtual DVD-ROM by select the Information symbol at the top row of the VM window (outside of the VM itself), and set the CDROM Storage Source path to No media detected (in some versions there may be a Disconnect button instead).

Reboot the VM, verify that it is working correctly, and then shut it down.
Convert to a Mender image
Preparation
In the next section we will convert the image to a Mender image, so that we can use Mender rootfs updates on it. First, get a copy of the mender-convert tool using this command:
git clone -b 3.0.0 https://github.com/mendersoftware/mender-convert(More recent versions may be available from Mender-convert's home page
Then copy or move the hdimg.img storage file where we installed Ubuntu, into the input folder inside the newly cloned mender-convert folder.
Build configuration
Next, we will set a few options for the conversion process that will suit our image, and make it more convenient for development. Inside the input folder, create a file called dev_config, with this content:
MENDER_COMPRESS_DISK_IMAGE=none
MENDER_ARTIFACT_COMPRESSION=none
IMAGE_OVERHEAD_FACTOR=1.2
MENDER_STORAGE_DEVICE_BASE=/dev/vda
MENDER_STORAGE_TOTAL_SIZE_MB=20000
The first two options disable compression, which is entirely for performance reasons. Compression is time consuming, and what we want is the quickest possible round trip time for development. IMAGE_OVERHEAD_FACTOR just makes the root filesystem as small as reasonably possible, but with a tiny bit of free space. MENDER_STORAGE_DEVICE_BASE sets the storage device name for QEMU, which is a virtual device, hence vda. Note that for some older versions of QEMU, this could be hda or sda instead. The symptom if this setting is wrong is that you can’t boot; if so the kernel will usually tell you which devices are available, so you can adjust it.
Finally, MENDER_STORAGE_TOTAL_SIZE_MB is the size of the complete image. This needs to be enough to hold two rootfs partitions, and the boot and data partitions. For a typical Ubuntu 20.04 installation, 20GB suffices, but you can increase this if necessary.
Runtime configuration
We need to set the server name which the Mender client will use, and it’s also a good idea to set some convenient polling intervals for development purposes. Copy the steps below, adjust the Mender Server URL if you need to, and then execute them:
mkdir -p input/rootfs_overlay_dev/etc/mender
cat > input/rootfs_overlay_dev/etc/mender/mender.conf <<EOF
{
  "ServerURL": "https://hosted.mender.io/",
  "InventoryPollIntervalSeconds": 5,
  "RetryPollIntervalSeconds": 30,
  "UpdatePollIntervalSeconds": 5
}
EOF
chmod 600 input/rootfs_overlay_dev/etc/mender/mender.conf
sudo chown root:root input/rootfs_overlay_dev
Conversion
After you have done the preparation above, run the conversion command:
MENDER_ARTIFACT_NAME=dev-image \ ./docker-mender-convert \ -d input/hdimg.img \ -c configs/ubuntu-qemux86-64_config \ -c input/dev_configRun the image
If everything went right, then your new disk image and Mender Artifact should be in the “deploy” folder. Usually the disk image will be called “hdimg-qemux86-64-mender.img”. Now, make sure that the QEMU VM is shut down in the Virtual Machine Manager, and then move the disk image (“.img”) from the “deploy” folder over to the same folder where “hdimg.img” is. Then create a new VM following the same steps as you did earlier, but with a couple of differences:
- Select “hdimg-qemux86-64-mender.img” as the storage file.
- Give the VM a different name.
- Omit the ISO/CD-ROM step.
Now start the VM. This should launch an instance which looks practically identical to the previous instance. But this is a Mender-enabled image, so under the hood, things are quite different. You can see it for yourself by launching a terminal and executing sudo fdisk -l /dev/vda:

As you can see, the system has two root filesystems now, of identical size, as well as a boot partition and an extra data partition.
Use the VM
Now let’s start using this for development. The first thing to do is to accept the VM device in the Mender UI. It should already be in the list since we inserted the Mender configuration file earlier.
What we do from here depends on what we want to work on, so let’s take a look at some development scenarios.
Develop software and test on the VM
The recommendation is to use Application updates to deploy the software from your workstation. Prepare the software you need, then create an Artifact according to the instructions for the Directory Update Module, upload it to the Mender server and deploy it to your VM to test it.
Develop software on the VM
This is appropriate for scripts that run directly on the device, unmodified (no compilation or preprocessing). Examples of such languages are Python or shell. Keep your software in one directory and develop directly on the VM. Create Artifacts using the Directory Update Module just as in the previous scenario, except create the Artifact inside the VM, instead of on your workstation. Then upload it to the Mender service to test on real hardware once in a while.
You will want to keep a copy of the source code on your workstation as well, both for backup purposes, and to submit to version control. When you are ready to save your work, upload the resulting Artifact from the VM, download it to your workstation from the Mender server, go to your source folder in a terminal, and execute the command below to update your local files. Replace <ARTIFACT> with the file you downloaded, and make sure you have no uncommitted changes there, because everything will be overwritten!
tar xOf <ARTIFACT> data/0000.tar.gz | tar xOz update.tar | tar xTest Rootfs Updates or State Scripts
Another thing which is useful to test in QEMU, is the upgrade procedure itself. This is especially useful if the update requires special steps in addition to the standard update mechanism provided by Mender. Such special steps might for example deal with
- Migration of persistent data or configuration
- Triggering UI or user notifications
and can be carried out by using Mender State Scripts, which allow the execution of custom scripts in various stages of the upgrade. To do this, use mender-convert, with customizations, to produce new Mender Artifacts. Invoke Mender-convert similar to how we did in the previous steps, but leave the img file unused. Instead upload the Artifact in the deploy folder to the Mender Server and perform full rootfs updates on the VM. To insert State Scripts into the Artifact, see the documentation on State Scripts.
Make Artifacts by snapshotting the VM
This method requires SSH to be running in the VM, so make sure it is installed, and waiting for connections by running this in the VM:
systemctl start sshAfter making modifications inside the VM, run the command below, on your workstation. This makes a snapshot which you can deploy, either to the VM as a test, or to other devices:
mender-artifact write rootfs-image -f ssh://${USER}@${ADDR} \ -n snapshot-1.0 \ -o snapshot-1.0.mender \ -t qemux86-64USER and ADDR must be set to the username and IP address of the VM login, respectively. Note that the user must have sudo access for the snapshot process to work. For more information about snapshots see the Mender documentation.
Conclusion
In this article we have first looked at the pros and cons of using QEMU in development and testing. Then we learned how to set up a virtual device using QEMU and the graphical frontend, Virtual Machine Manager. We have installed Ubuntu, and then taken that image and converted it into a Mender image, prepared for robust rootfs updates. Then we have looked at several ways this VM can be utilized to develop and test new software and image changes, before they are deployed on real devices.
Recent articles
Complying with the US FDA and EU MDR requires software updates
IoT in 2026: Edge AI, growing complexity, and the demand for smarter updates
New Mender experimental AI-enabled feature
Learn why leading companies choose Mender
Discover how Mender empowers both you and your customers with secure and reliable over-the-air updates for IoT devices. Focus on your product, and benefit from specialized OTA expertise and best practices.


