Both the BeagleBone Black and Raspberry Pi family of boards provide solid, affordable single board computer options for your embedded systems project. If you want to add robust and secure OTA system updates to your devices then Mender will support both.
Which board to select for your project?
Which board you select may boil down to a few factors such as your level of reliance on community support to get one of these boards integrated with OTA, your level of experience with booting these models and being able to navigate through what might be a tricky boot process, or your power support preferences - whether your custom build requires USB 3 or maybe USB 2 is enough?
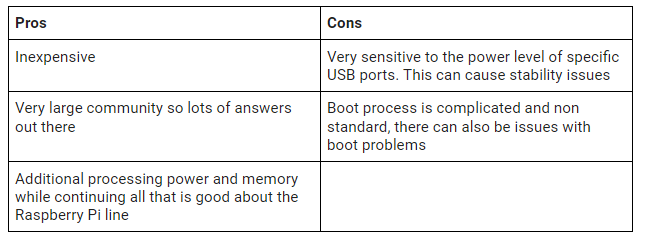
Comparing Raspberry Pi 3 to Beaglebone Black — pros and cons
Our engineers Kristian Amlie and Ole Orhagen both have great familiarity with using these boards. They share some of their experiences with using Beaglebone Black in comparison to the Raspberry Pi families in the following comparison:
Raspberry Pi 3 
Raspberry Pi 4 
Beaglebone Black 
Specifications comparison
The processor speed on the Beaglebone Black is faster at 1Ghz compared to 700Mhz for the Raspberry Pi. It’s a ARM Cortex A-8 processor as opposed to an ARM 11 based one. The importance of processor speed depends heavily on the use case but no doubt a 300Mhz can be significant.
There are many more GPIO pins available on the Beaglebone Black with 69 compared to 26 for the Raspberry Pi. The Beaglebone also has 5 UARTS for transmitting and receiving serial port data while Raspberry PI 2/3 have two UARTS, uart1 and uart0. Raspberry Pi 4 has four additional UARTs available. When it comes to USB ports - Raspberry Pi 1, 2, 3 have 4 USB 2.0 ports, while Raspberry Pi 4 has 2 USB 2.0 ports + 2 USB 3.0 ports as opposed to Beaglebone Black having only one 2.0.
The main advantage of this is that there is no need to connect an extra USB hub to the unit. This would of course make your assembly bigger if you had to connect an extra USB hub. This is assuming you actually need 2 USB ports to begin with. If you don't, then it is of no importance. If you need to connect, for example, a camera and small rotating engine, then you're already at two, so it's pretty common to need both.
For I/O pins, the Beaglebone sports 65 digital and 7 analogue pins, while the Raspberry Pi has only 26 digital pins and zero analogue pins. The more the pins, the larger the number of peripherals which can be connected to the device. Digital pins are used to connect with other digital devices, while analog pins allow connecting of peripherals which output analog values. This periphery is usually cheaper. Do note that not all pins are created equal and the diversity of protocols exposed through the pins is as important as their number if not more.
Raspberry Pi has an advantage on multimedia capabilities, supporting both HDMI and analogue audio output via a 3.5mm jack, along with dual micro-HDMI ports that support 4K video output, making it ideal for media-intensive projects. The BeagleBone Black, while capable, is more limited, with audio output only via micro-HDMI and a simpler video setup, supporting 1080p output but lacking a dedicated GPU for video processing. These differences make the Raspberry Pi more suitable for projects requiring multimedia performance, while the BeagleBone Black’s design favors industrial and real-time control applications.
Either board can be integrated with Mender
If you want to do OTA software updates with Mender for Beaglebone Black, there is an official reference integration on Mender Hub.
Beaglebone Black and Mender has been tested and verified for supporting a Yocto layer integration. The Mender integration completes without errors and outputs images in a Yocto build for versions Zeus, Warrior, thud and sumo. The runtime integration check list has also been verified to ensure that Mender works with Beaglebone Black boards including U Boot-based boards.
An 8 GB or larger SD card, a universal power supply and internet connectivity - Ethernet or Wi-Fi for your Raspberry Pi are also required. While internet connectivity—via Ethernet or Wi-Fi—is useful for the initial setup and updates, both Raspberry Pi and Beaglebone support offline operation, allowing users to work in environments where internet access might be limited or unavailable.
A full description of how to use Mender with a Raspberry Pi is available in this tutorial. The tutorial covers the prerequisites, the flashing of the Raspberry Pi, the optional configuration of the wireless network and enabling SSH in headless mode.
Keep reading
To delve deeper into utilizing Beaglebone in your embedded Linux project, explore the following articles:
Related articles
Over-the-air update strategies for Raspberry Pi-based embedded systems
Over-the-Air Updates on Raspberry Pi
How to leverage over-the-air (OTA) updates for NVIDIA Jetson Platform Services
Learn why leading companies choose Mender
Discover how Mender empowers both you and your customers with secure and reliable over-the-air updates for IoT devices. Focus on your product, and benefit from specialized OTA expertise and best practices.


