Integrating Mender State Scripts in Yocto - A Step by Step Guide

This tutorial will explain specifically the concept of state scripts in the OTA solution Mender.io and give an example of how to integrate them into Yocto embedded Linux.
To begin with, let’s explain what Mender state scripts are and what typical use cases they can serve? The Mender Client has the ability to run scripts at defined points in the update deployment procedure. Those state scripts are more general and useful than the pre/postinstall scripts that most package management solutions offer because they can be run between any state transition, not just (before/after) the install state.
Example use cases for Mender state scripts include:
- Application data migration
- Update confirmation by end user
- Custom sanity checks after the update is installed
- Enabling network connectivity on the device.
Prerequisites
The following prerequisites are required for this tutorial:
- A Raspberry Pi 4 with an SDCard included and SD card read writer
- Kas - the setup tool for bit bake projects - should be installed on the system
Tutorial steps
This tutorial has been tested with Ubuntu 20.04.
Step 1: Setting the field
The example set up will be carried out on a Raspberry Pi 4. Other targets work in a similar manner and require only minor adjustments. To start the example, a working Yocto build with a Mender integration must be set up.
Step 2: Configuring the build
Please save the linked content into a file called mender-rpi4.yml.
Set the MENDER_TENANT_TOKEN the value associated with your account.
Step 3: Building the basic image
Once that is set, run the commands below to build the base image. Depending on your development setup, allow a few hours for the build process to finish.
Using the kas shell with the config file we’re automatically moved to the yocto build directory with all the tools needed to work with yocto available in PATH. It’s a more convenient way to start working with Yocto compared to invoking oe-init-build-env and then manually adjusting the configuration.
kas shell mender-rpi4.yml
bitbake core-image-minimal
Gather the build files and upload them to Hosted Mender or flash to the SDCard.
Step 4: Introducing state scripts
State scripts are a way to customize the update process. This is a similar concept to the pre-install or post-install scripts mechanism provided by the Debian package management system.
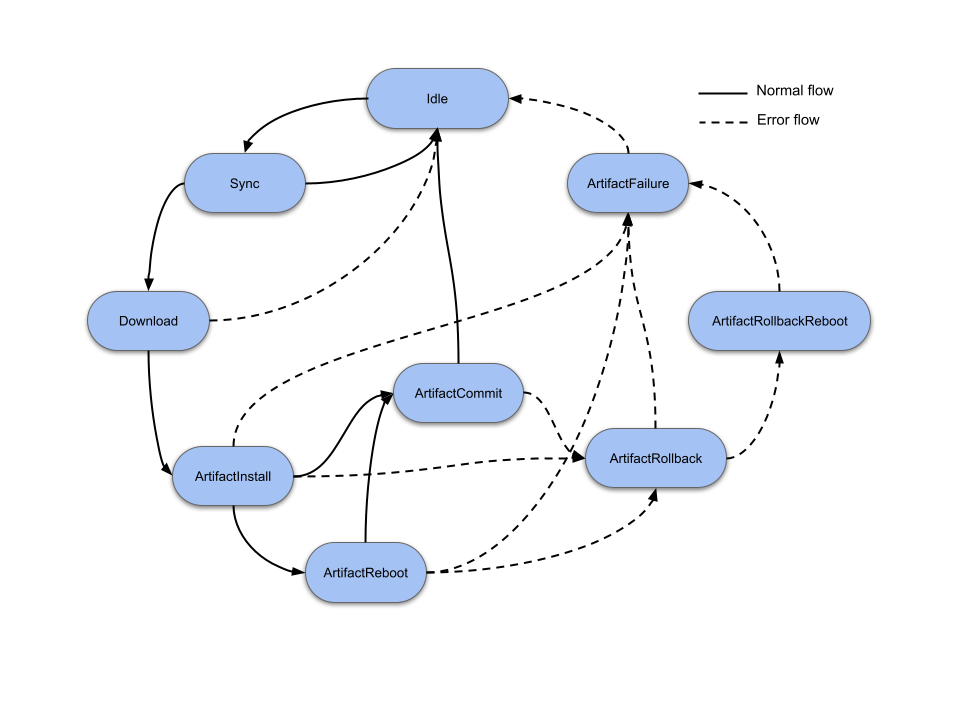
Without the scripts, the unmodified update process goes through a list of states from start to finish. In a simplified manner it looks like this:

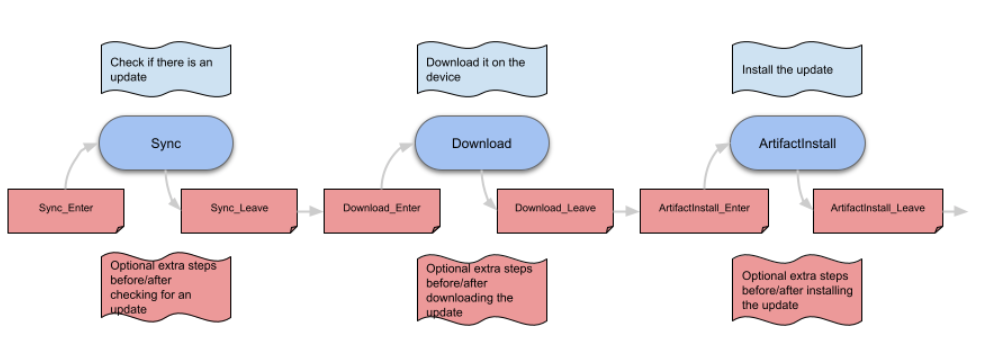
State scripts allow extension of those states with custom steps:

The image shows all the state scripts for a non error case, you can implement multiple for the same state or none at all.
How do the state scripts reach the device?
There are two ways for state scripts to reach the device and get executed:
- deployed alongside the update which is taking place - Artifact state scripts
- pre-loaded on the device - Root file system state scripts

How to include Mender State Scripts in the Yocto Build Process
Including the state scripts will require the creation of a dedicated Yocto recipe which uses a helper class for installing state scripts.
The steps outlined below will create the new layer with the state scripts recipe in it. Using the kas shell command, we open a shell setup for development on the given configuration. This shell can be kept open, or closed and reopened when needed using the same command.
kas shell mender-rpi4.yml
bitbake-layers create-layer meta-example
bitbake-layers add-layer meta-example

mkdir -p  meta-example/recipes-example/state-scripts/files

cat > meta-example/recipes-example/state-scripts/files/Download_Leave_10 << EOF
#!/usr/bin/env sh
>&2 echo "Printed from Download_Leave_10"
EOF

cat > meta-example/recipes-example/state-scripts/files/ArtifactInstall_Enter_10 << EOF
#!/usr/bin/env sh
>&2 echo "Printed from ArtifactInstall_Enter_10"
EOF

cat >  meta-example/recipes-example/state-scripts/state-scripts.bb << "EOF"
LICENSE="CLOSED"
FILESEXTRAPATHS_prepend := "${THISDIR}/files:"
SRC_URI += "file://Download_Leave_10;subdir=${BPN}-${PV} \ file://ArtifactInstall_Enter_10;subdir=${BPN}-${PV}"
inherit mender-state-scripts

do_compile() {
    cp Download_Leave_10 ${MENDER_STATE_SCRIPTS_DIR}/Download_Leave_10
    cp ArtifactInstall_Enter_10 ${MENDER_STATE_SCRIPTS_DIR}/ArtifactInstall_Enter_10
}

EOF
With the recipe and layer created, the state-script recipe now needs to be added to the build. In addition to that a new name should be given to separate the newly built files from the old ones.
cat >> conf/local.conf << EOF IMAGE_INSTALL_append = " state-scripts" EOF

sed -i 's/^MENDER_ARTIFACT_NAME.*/MENDER_ARTIFACT_NAME = "rpi4-kas-build-state-scripts"/g' conf/local.conf
Building the image with state scripts
Once that is done, kick off the build.
bitbake core-image-minimalGather the build files and upload them to Hosted Mender.
Seeing the scripts in action
As you deploy the new release to your board, the Artifact state script (ArtifactInstall_Enter_10) will be executed. This can be tracked by going to the device shell (either via UART/SSH or Remote Terminal) and running journalctl -fu mender-client.
You should see an output like this when doing an update from version rpi4-kas-build to rpi4-kas-build-state-scripts:
level=info msg="Executing script: ArtifactInstall_Enter_10"
level=info msg="Collected output (stderr) while running script /var/lib/mender/scripts/ArtifactInstall_Enter_10\nPrinted from ArtifactInstall_Enter_10\n\n---------- end of script output"
There is no output for the Download_Leave_10 as it is a Root file system state script and it isn't present on the rpi4-kas-build version. However as the device is now running rpi4-kas-build-state-scripts, this version has /etc/mender/scripts/Download_Leave_10 present.
As a result of this, doing an update from version rpi4-kas-build-state-scripts to rpi4-kas-build will give the following output:
level=info msg="Executing script: Download_Leave_10"
level=info msg="Collected output (stderr) while running script /etc/mender/scripts/Download_Leave_10\nPrinted from Download_Leave_10\n\n---------- end of script output"
Conclusion
In this tutorial, we have shown how to extend the default Mender OTA update behavior with state scripts. The concept behind the state scripts was also explained where they were conceptually compared to the pre and post install scripts of package managers. Additionally, an example was given on integrating the state scripts in the Yocto build process. This required the creation of a custom recipe.
Appendix
To get the tenant token value, log into Hosted Mender, from the upper left corner select My Organization and copy the Organization token to clipboard.
This is the value of your MENDER_TENANT_TOKEN.
Back to "Configuring the build"
Gathering the build output
As a result of the build, Yocto creates a lot of files buried deep into the directory structure. From a practical standpoint, we only need two.
The command below will gather needed files in the artifacts into an accessible directory.
# Executed from the build dir (bitbake in path)
mkdir artifacts

BITBAKE_ENV=$(bitbake -e core-image-minimal | grep -E "^DEPLOY_DIR_IMAGE=|^IMAGE_LINK_NAME")
export $(echo $BITBAKE_ENV | sed 's/"//g')
cp ${DEPLOY_DIR_IMAGE}/${IMAGE_LINK_NAME}.mender artifacts
cp ${DEPLOY_DIR_IMAGE}/${IMAGE_LINK_NAME}.sdimg artifactsUploading and flashing
Two artifacts will be available in the artifacts directory. They have different purposes:
.sdimage- flash it directly on the SDCard
- this only needs to be done once
.mender- represents the release which can be deployed to a device over the air
Please flash your SDCard with the .sdimg, place it in the Raspberry Pi 4 and power it up. The device should soon be visible in Hosted Mender as pending.
In addition to this, please upload the .mender file (Mender artifact) to Hosted Mender. Log into Hosted Mender, select Releases from the menu on the left and click Upload.
mender-rpi4.yml
The content below should be copied to the file called mender-rpi4.yml.
header:
  version: 10

machine: raspberrypi4

repos:
  poky:
    url: https://git.yoctoproject.org/git/poky
    refspec: "dunfell"
    layers:
      meta:
      meta-poky:
      meta-yocto-bsp:

  meta-openembedded:
    url: http://git.openembedded.org/meta-openembedded
    refspec: "dunfell"
    layers:
      meta-oe:
      meta-python:
      meta-networking:
      meta-multimedia:

  meta-raspberrypi:
    url: https://github.com/agherzan/meta-raspberrypi
    refspec: "dunfell"
    layers:
      .:

  meta-mender:
    url: https://github.com/mendersoftware/meta-mender
    refspec: "dunfell"
    layers:
      meta-mender-core:
      meta-mender-demo:
      meta-mender-raspberrypi:

bblayers_conf_header:
  standard: | POKY_BBLAYERS_CONF_VERSION = "1" BBPATH = "${TOPDIR}" BBFILES ?= ""
local_conf_header:
  enable_systemd: | DISTRO_FEATURES_append = " systemd" VIRTUAL-RUNTIME_init_manager = "systemd" VIRTUAL-RUNTIME_initscripts = ""
  general_helpers: | INHERIT += "rm_work" IMAGE_FEATURES += "ssh-server-openssh allow-empty-password debug-tweaks" IMAGE_INSTALL_append = " python3"
  rpi_helpers: | ENABLE_UART = "1" RPI_EXTRA_CONFIG="dtoverlay=disable-bt"
  mender_device_integration: | IMAGE_LINK_NAME_append = "-${MENDER_ARTIFACT_NAME}" INHERIT += "mender-full" RPI_USE_U_BOOT = "1" IMAGE_FSTYPES_remove += " rpi-sdimg" MENDER_FEATURES_ENABLE_append = " mender-uboot mender-image-sd" MENDER_FEATURES_DISABLE_append = " mender-grub mender-image-uefi" MENDER_BOOT_PART_SIZE_MB = "40"
dynamic: | MENDER_ARTIFACT_NAME = "rpi4-kas-build" MENDER_SERVER_URL = "https://hosted.mender.io" MENDER_TENANT_TOKEN = "" <--- Insert correct valueRecent articles
New Mender experimental AI-enabled feature
Mender in 2025: A year in review with compliance, security, and AI-driven growth
What’s new in Mender: Enhanced delta updates and user experience
Learn why leading companies choose Mender
Discover how Mender empowers both you and your customers with secure and reliable over-the-air updates for IoT devices. Focus on your product, and benefit from specialized OTA expertise and best practices.


